Canvas Tutorial
This is a quick Canvas intro and refresher for FSU Art History instructors. More detailed assistance is available in the Canvas Support Center (the Help button on your Canvas Dashboard). FSU instructors also have access to the Instructor Training Course; we highly recommend looking it over before you use Canvas for the first time.
CONTENTS
Click images to expand.
DASHBOARD |
General announcements at the top of your Dashboard can be removed by clicking X on the top right.
In the left navigation column, Inbox opens the Canvas message center, Help opens the Support Center, and Account opens personal settings – contact info, notification preferences, past course evaluations, and a shortcut to all the files you’ve loaded in Canvas. To see all courses you’ve ever participated in, click Courses on left, then All Courses at bottom. |
 |
CUSTOMIZE DASHBOARD |
When viewing all courses, you can chose the ones you want to see on your Dashboard. To reveal or hide a course, just click the small star to the left of it.
Unstarred courses will still be available when you click All Courses, but they won’t clutter up your Dashboard. |
 |
NEW COURSE |
Course sites are automatically created. New courses are unpublished (visible only to you) until you click Publish.
The course navigation on the left always includes the same items in the same order. Within each course you can limit student access to certain items. Dark grey items are visible to students, light grey items are just for you. When you first open a new course, there is a link on the right to Choose Home Page – the first page students see. For a very simple course site, most users select either the default Front Page or the Syllabus. |
 |
COURSE SETTINGS
|
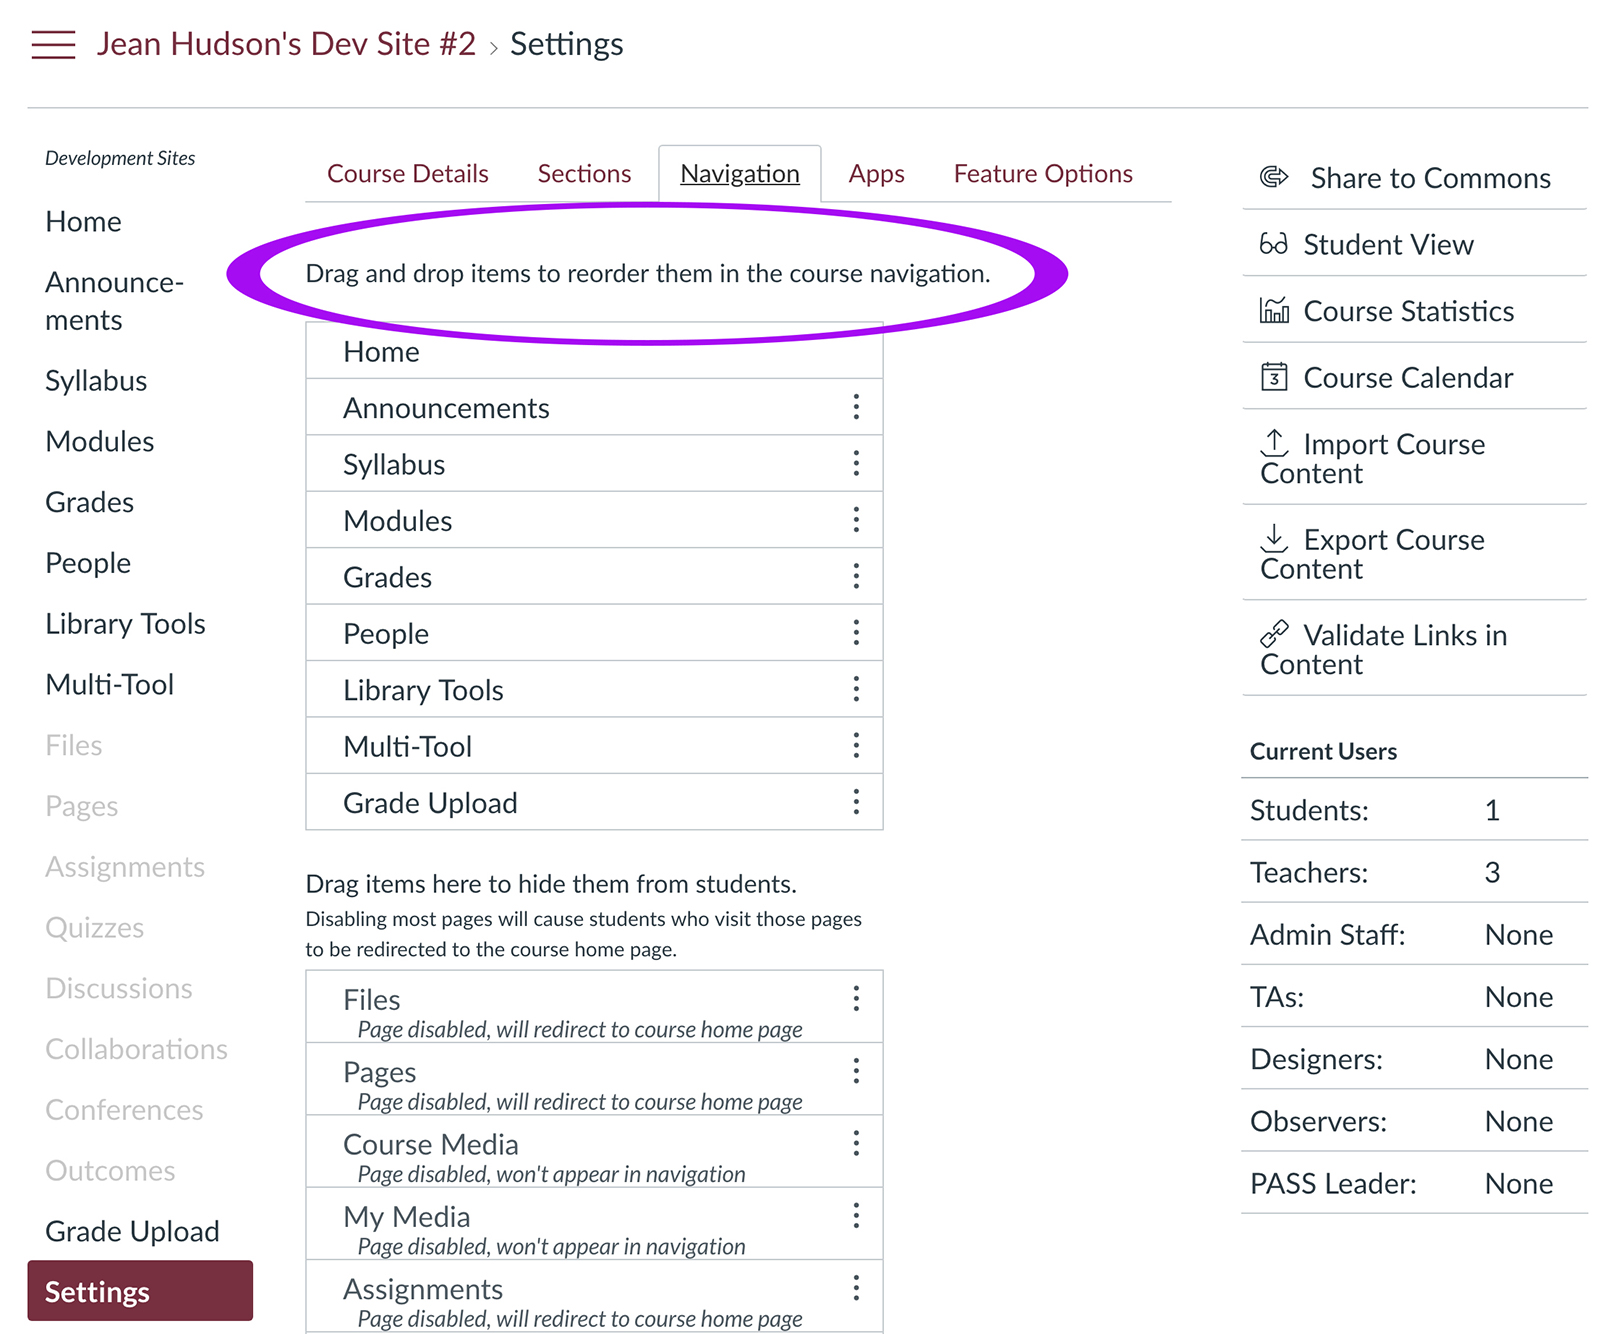
Once you click into a course, click Settings at bottom left to set basic info for the course.
Under the Course Details tab at the top, you can edit the course name, the image that appears on Dashboards, and the time period when students can see the course.The Navigation tab is where you allow or deny student access to the items in the left column. |
 |
COPYING CONTENT
|
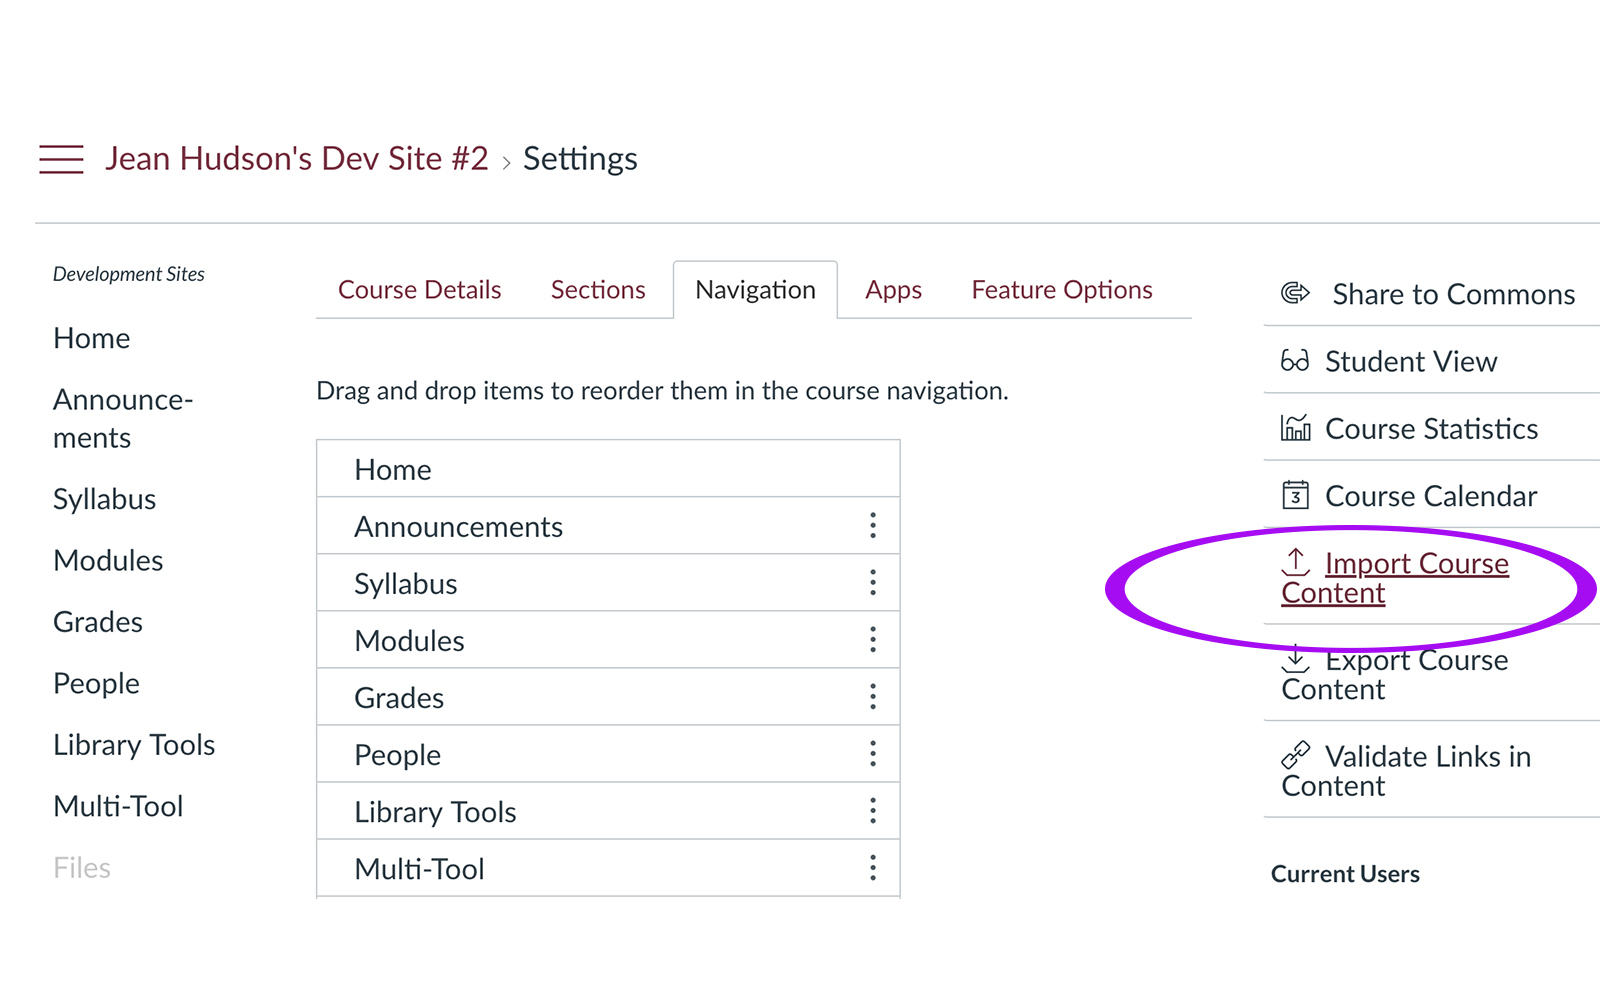
Also under Settings is the Import Content feature – a time-saver if you’ve taught a course before and want to use most of the same content, or if you just want to use the same layout you used in a past course.
Click Import Course Content on the right, then under Content Type choose Copy a Canvas Course. In the next steps you will search for the original course and choose what to copy. The easiest option is to copy the whole course and then remove/edit as needed. Former students will not be added to the new course. |
 |
STUDENT VIEW
|
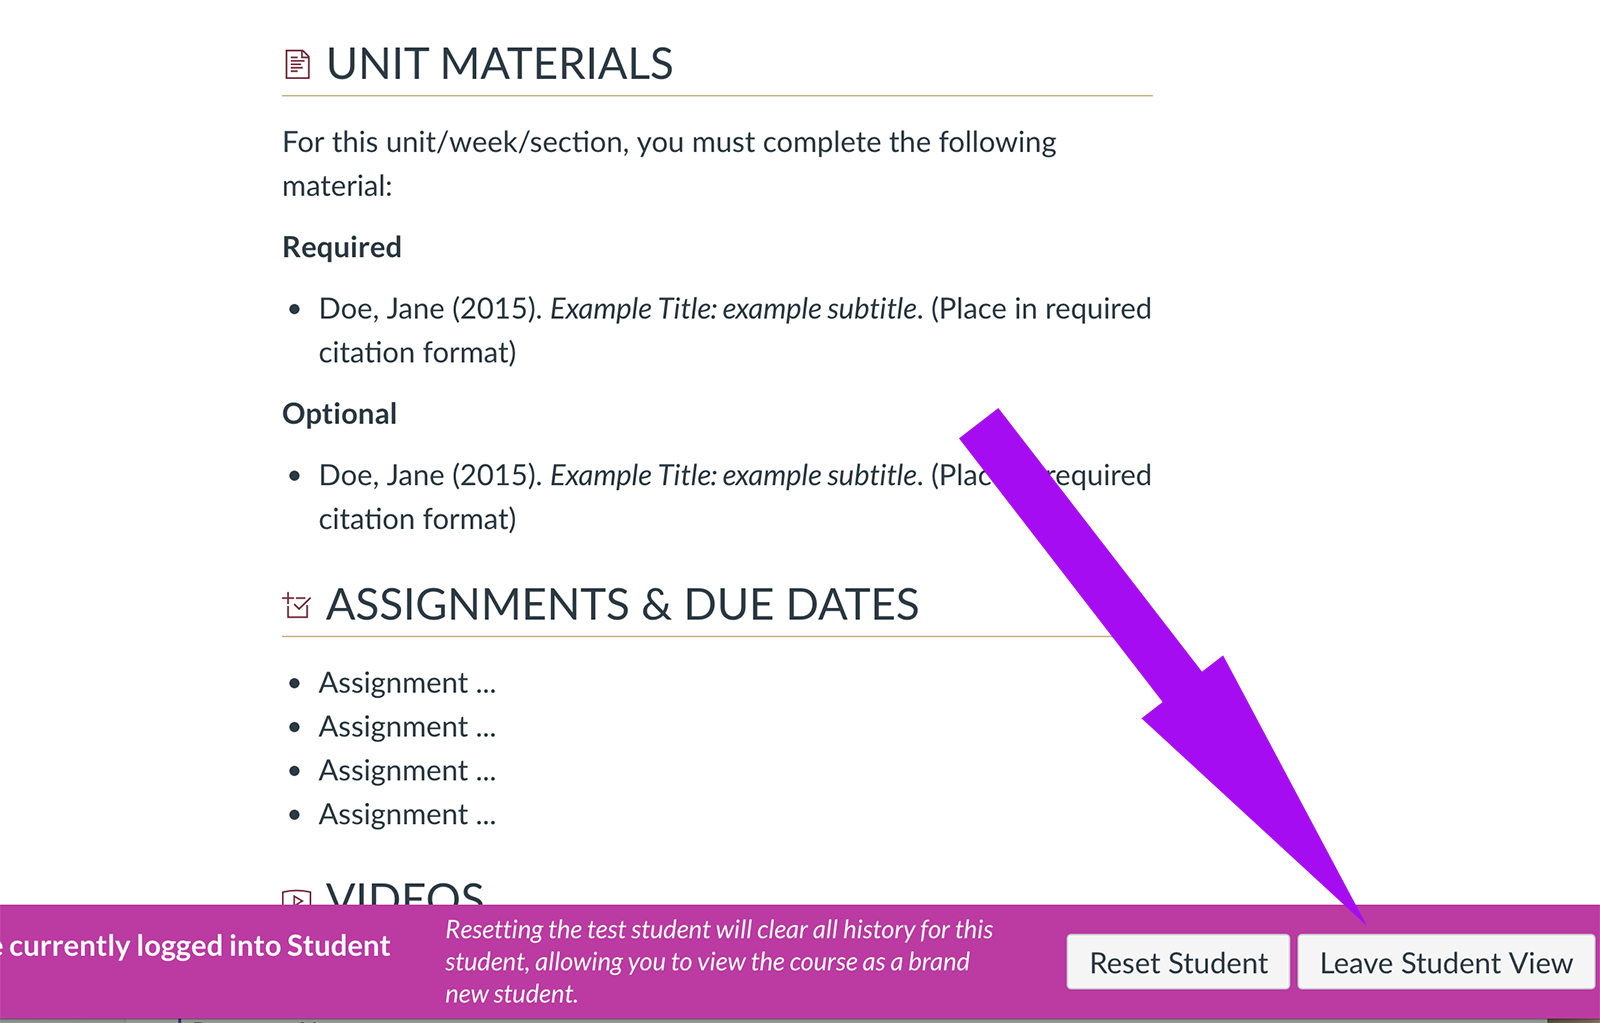
Also under Settings: on the top right, click Student View to see exactly how your course appears to students, check the availability of items in the navigation column, test features such as discussion board posts, and be sure links are working.
While you are in Student View, there is a purple footer across the bottom of the site. When you’re ready to return to editing mode, click Leave Student View on the bottom right. |
 |
HOME PAGE
|
The Home Page is the first thing students see when they click on your course. There are several options here, and the choice can be changed later. If you select the default Front Page, there are many built-in themes for customization:
To choose a pre-made home page template, go to your Home Page and click Edit on the top right. Then hover the cursor over the very small rocket icon in the top right corner, revealing the Launch Design Tools button. Click that, and go to the next step. |
 |
CHOOSE A DESIGN THEME |
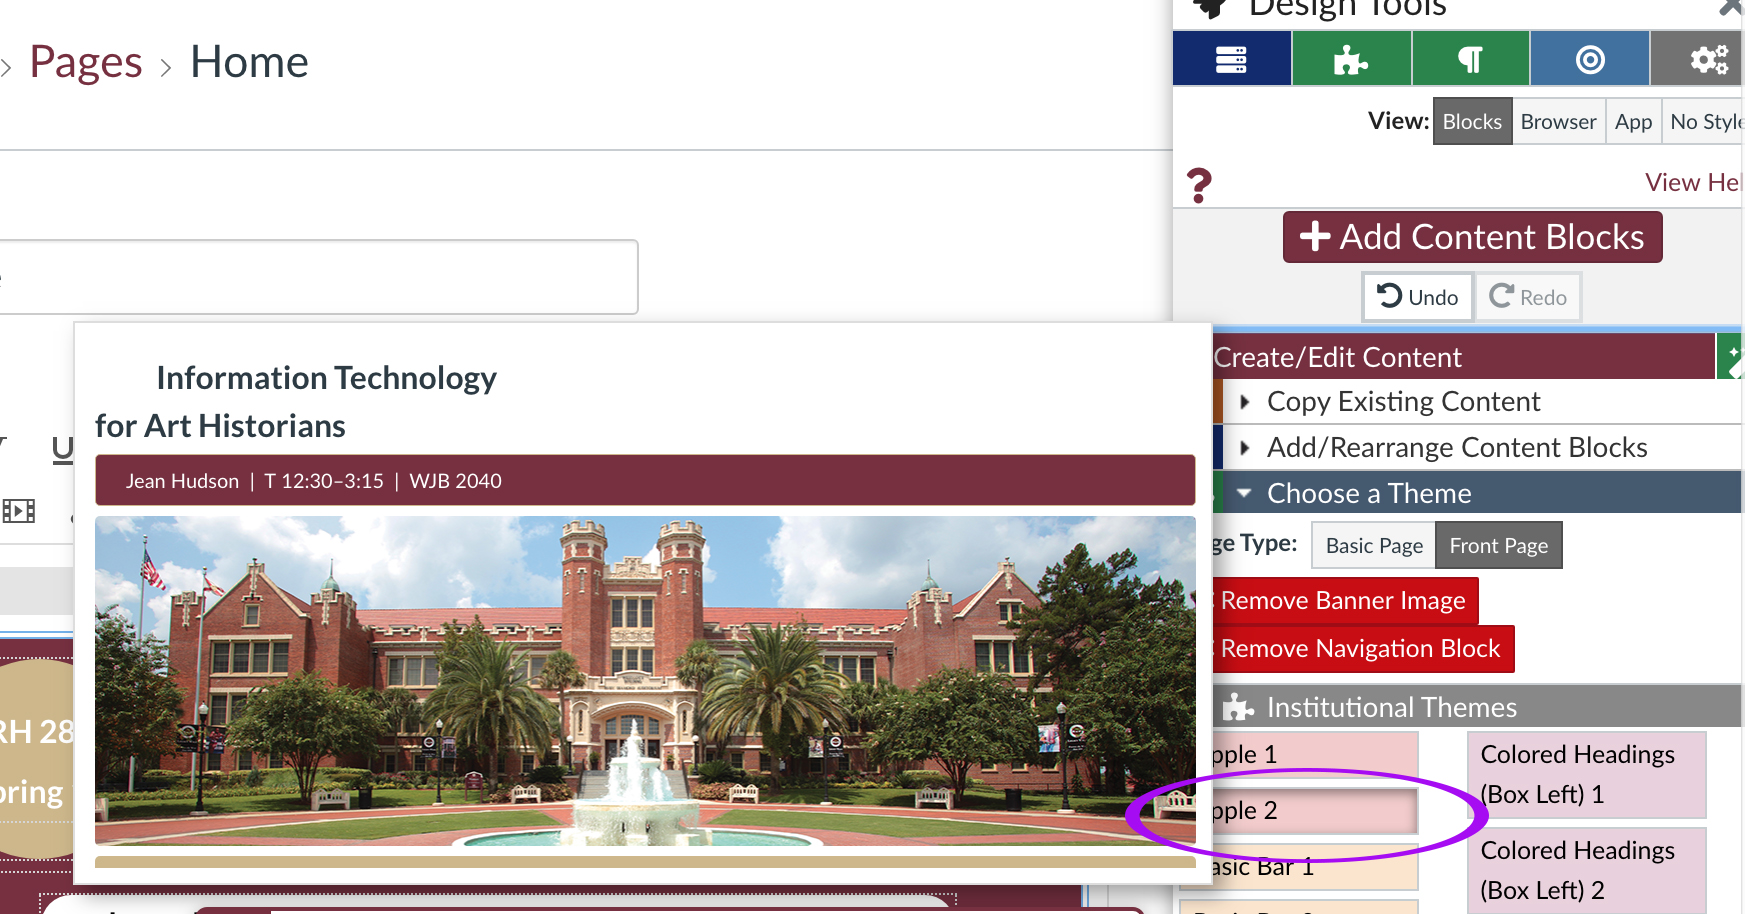
On the Design Tools menu, click the second icon (a jigsaw puzzle piece) to expand the Choose a Theme panel.
On the panel, hover over the different options to preview and choose a banner image and layout for your Home Page. These tools are also available on other pages, so you can use a consistent design theme throughout your course site. |
 |
EDIT CONTENT BLOCKS |
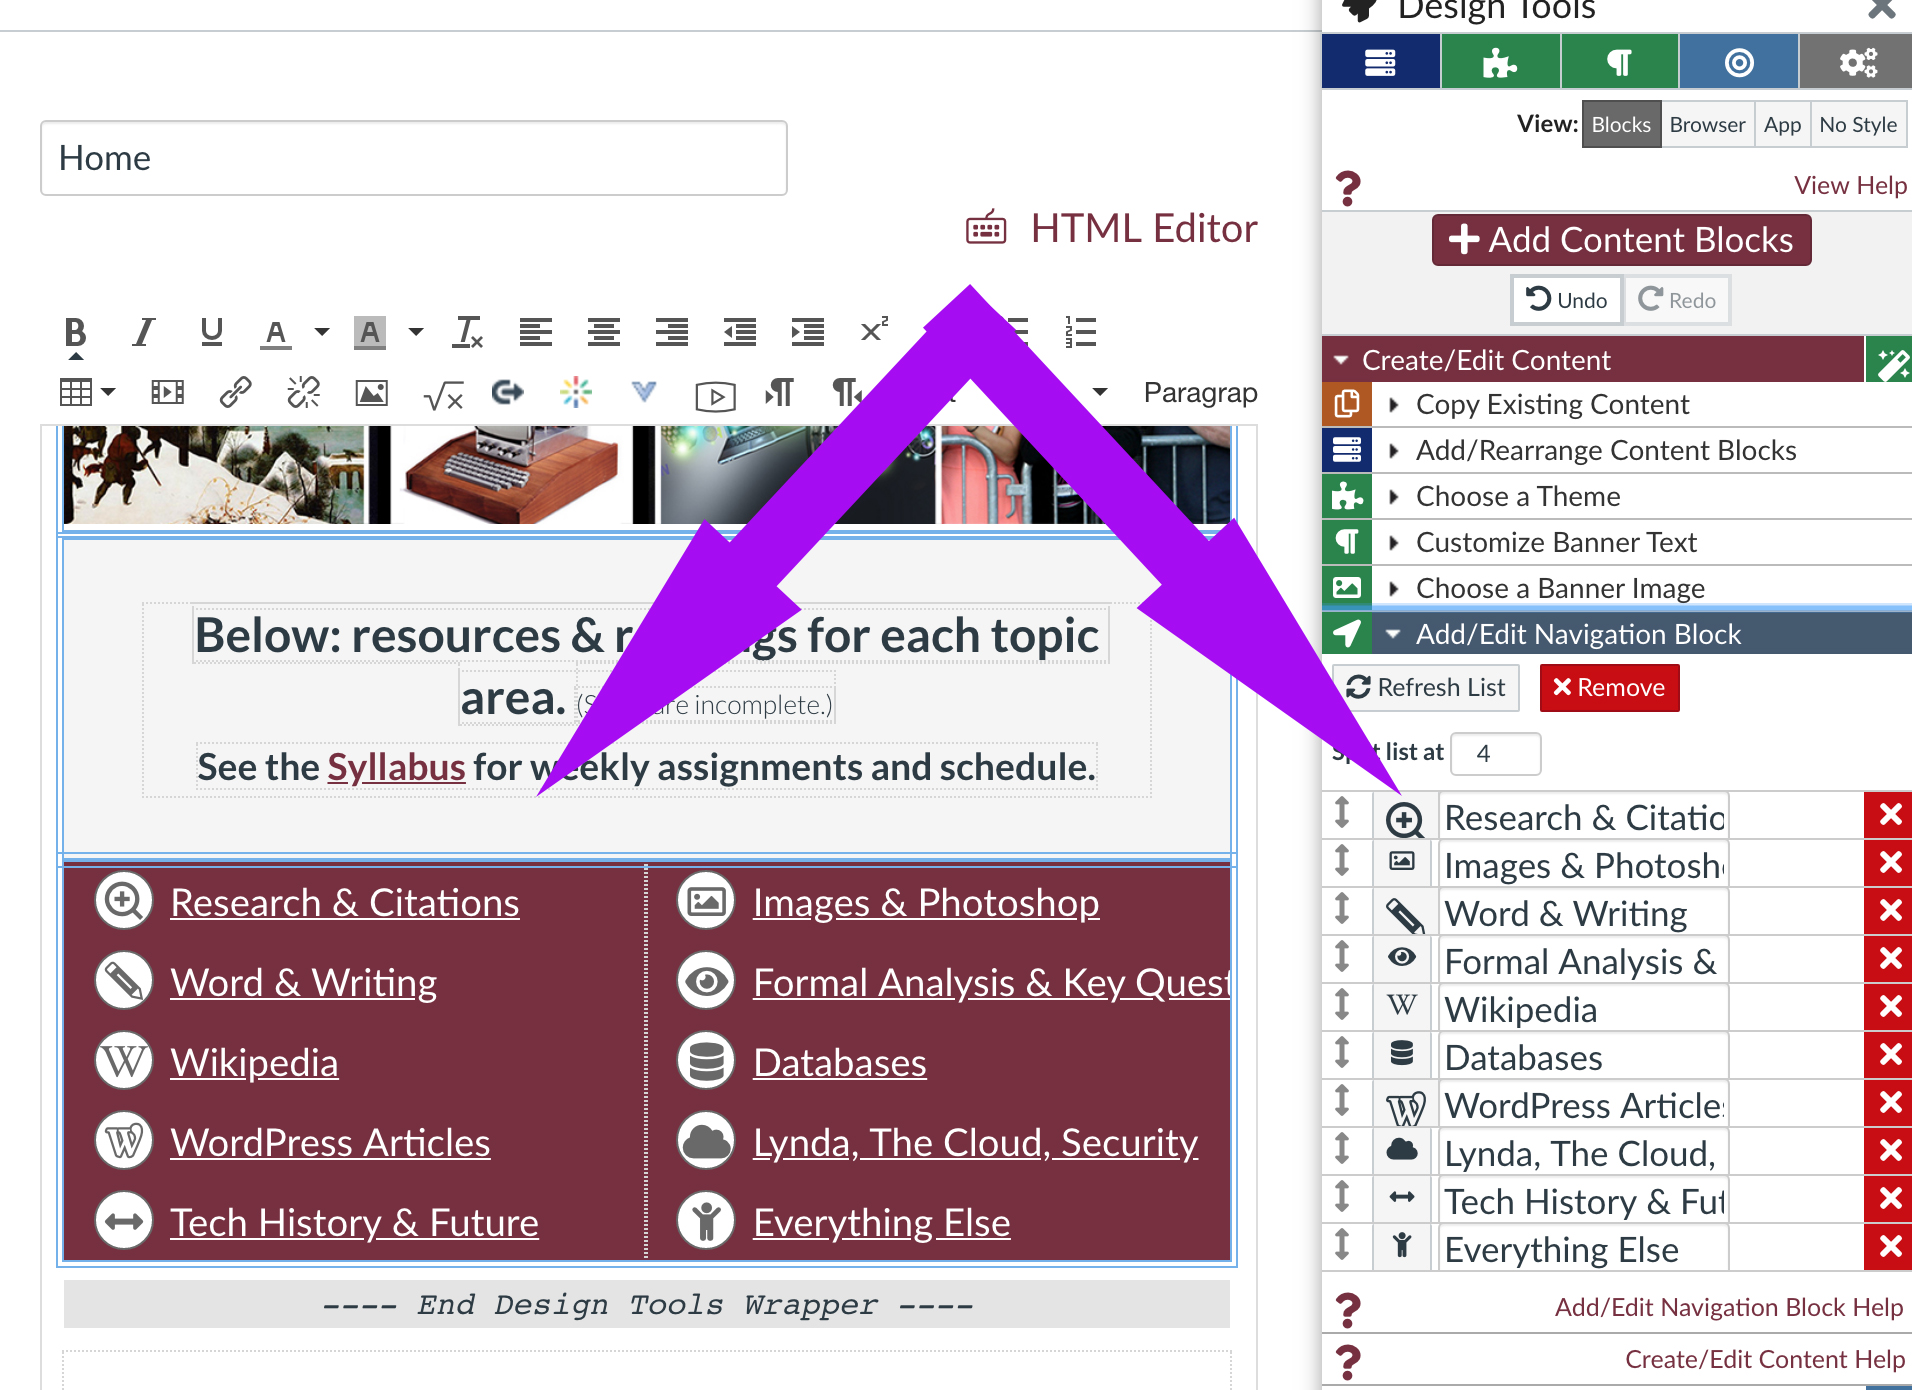
On the Design Tools menu, also see the other drop-down menus below Themes: Customize Banner Text and Add/Edit Navigation Blocks. This is where you can change the content and page links on your Home Page without altering the overall design theme.
In the example image on the right, you can see how the list of Navigation Blocks on the right appear on the actual Home Page on the left. |
 |
SYLLABUS
|
It’s a good idea to enter content directly on the Syllabus page, rather than just uploading a Word document. Many students use mobile devices to view their course sites, and page content is more visible and interactive than linked documents.
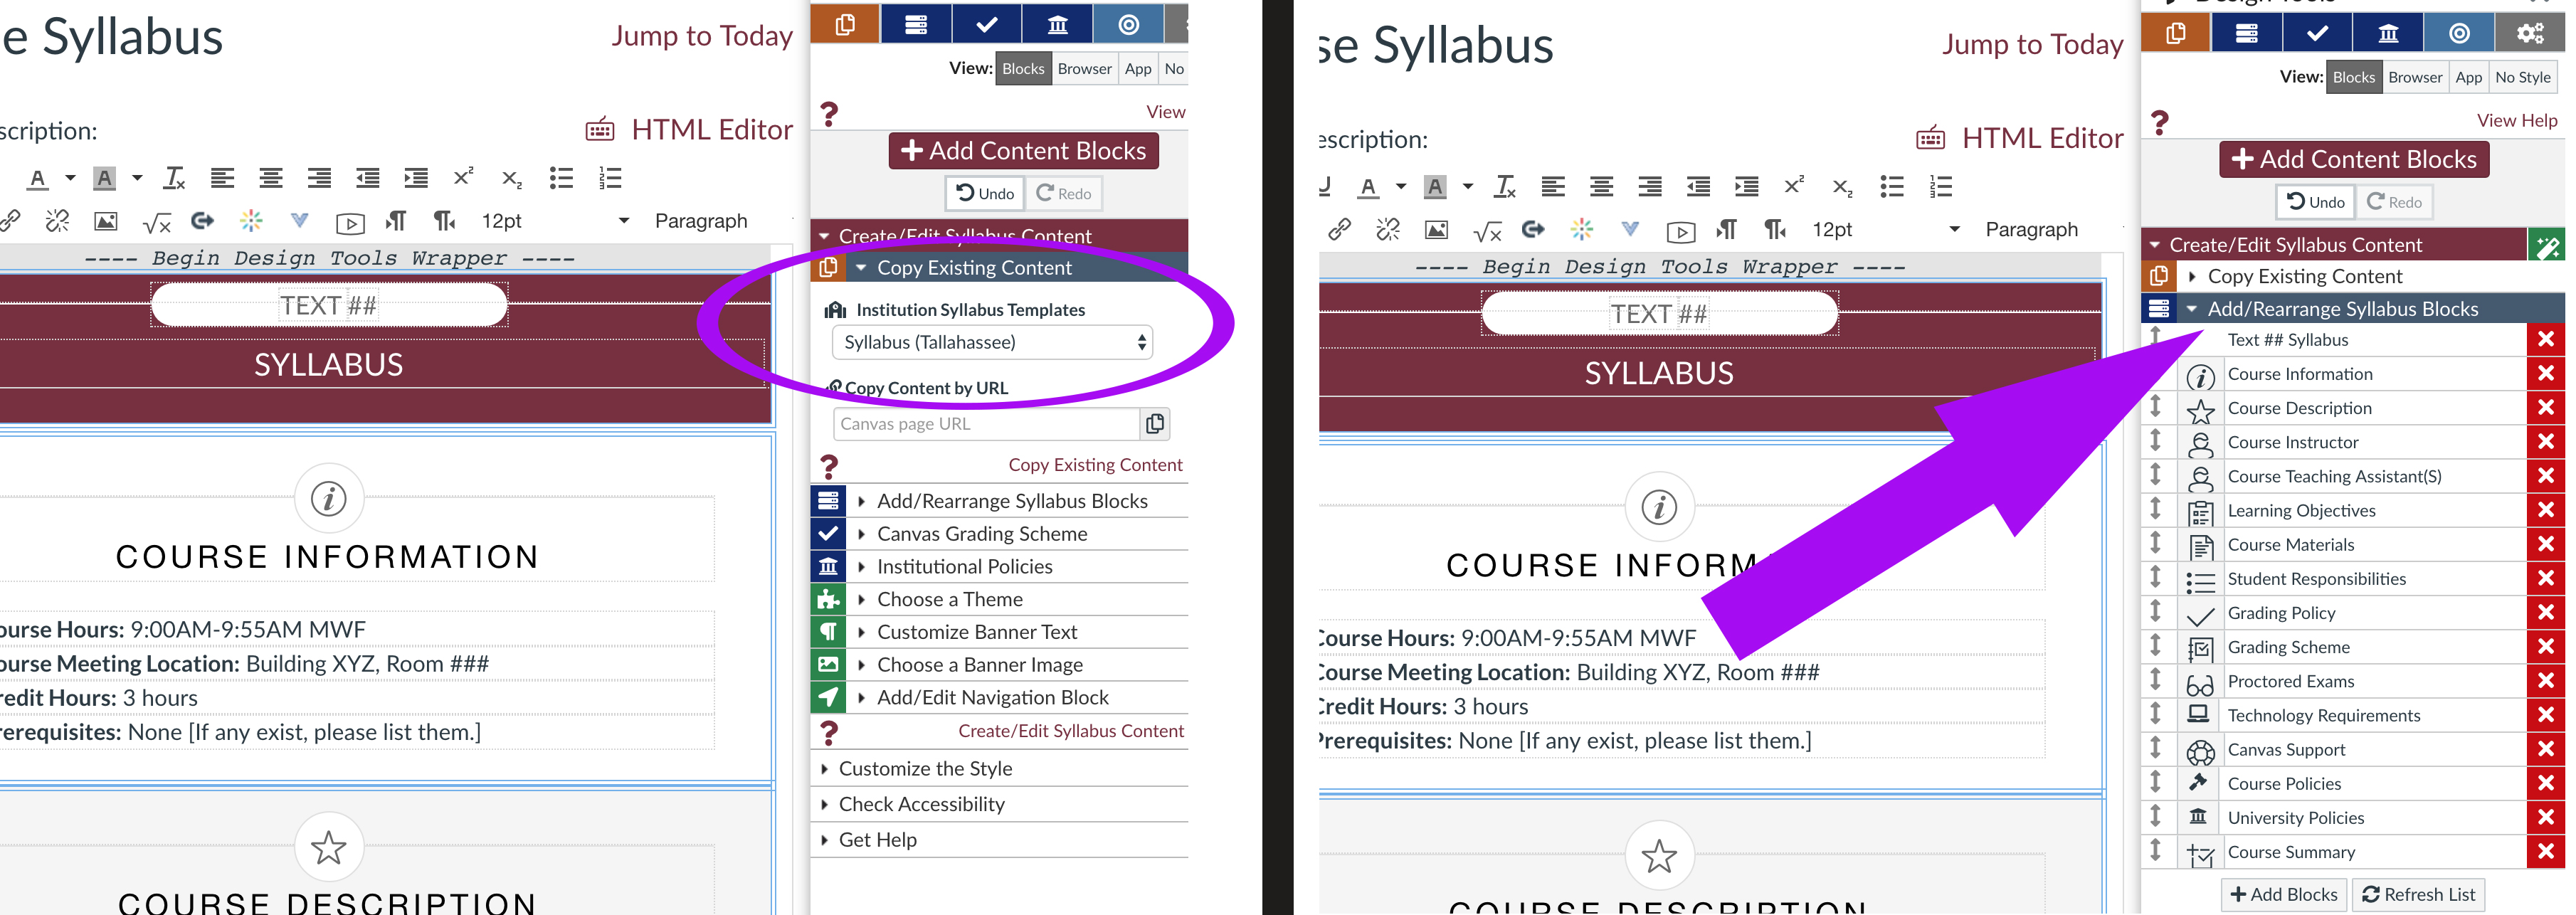
Like the Home page, the Syllabus page has predesigned templates you can fill in and customize. Go to your Syllabus, click Edit, then hover the cursor over the rocket icon in the top right corner, revealing the Launch Design Tools button. Click that, then go to Create/Edit Syllabus Content. Choose an FSU campus syllabus template, then edit the content blocks. This template will automatically fill in the required FSU statements, and update them whenever you edit the syllabus. The best way to remove unwanted content blocks from this syllabus template is by using the Add/Rearrange Syllabus Blocks menu under Design Tools. Just click the X to eliminate a block. To convert your completed Syllabus page to a PDF file, just right-click anywhere on the Syllabus page, select Print.., and choose Save as PDF. |
 |
PAGES
|
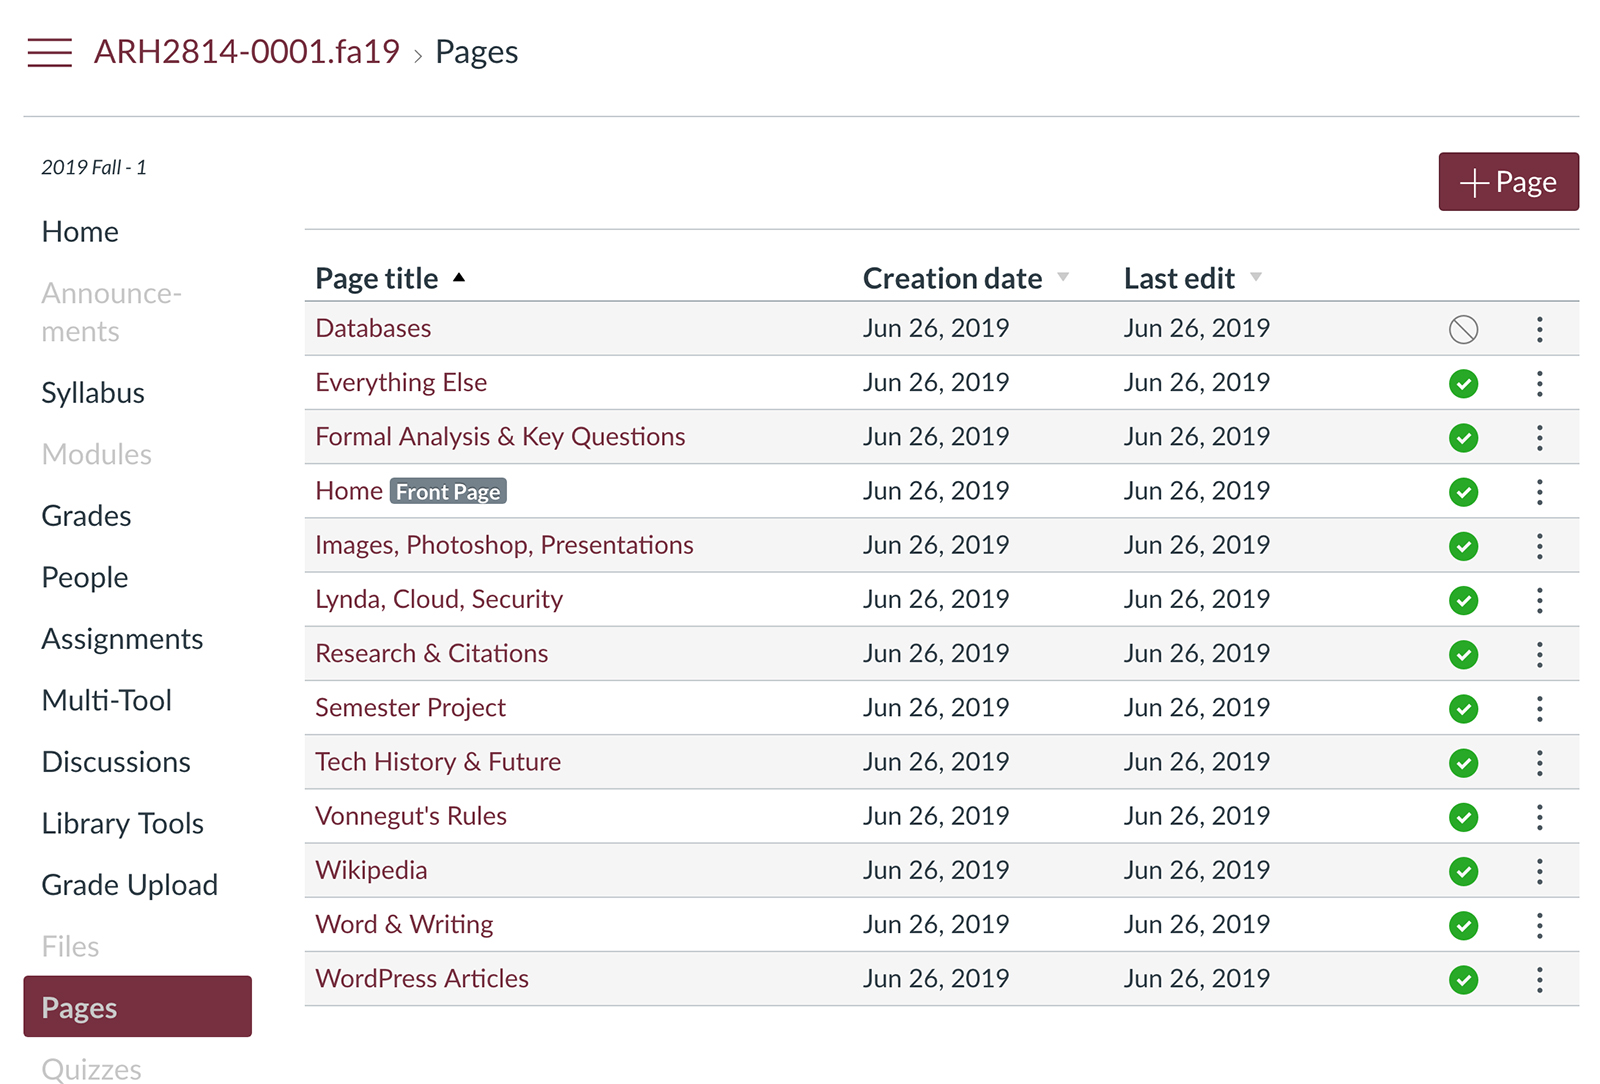
For traditional face-to-face courses, most faculty choose a very simple Canvas layout and arrange the content in pages – for example, a page for each week of the course.
You can upload readings into the Files area of the course, then provide the links to the files and instructions/details on the page for that week (and/or on the Syllabus). To view all of your pages at once, click Pages in the left navigation column. From here, click +Page on the top right to add a new page. |
 |
MODULES
|
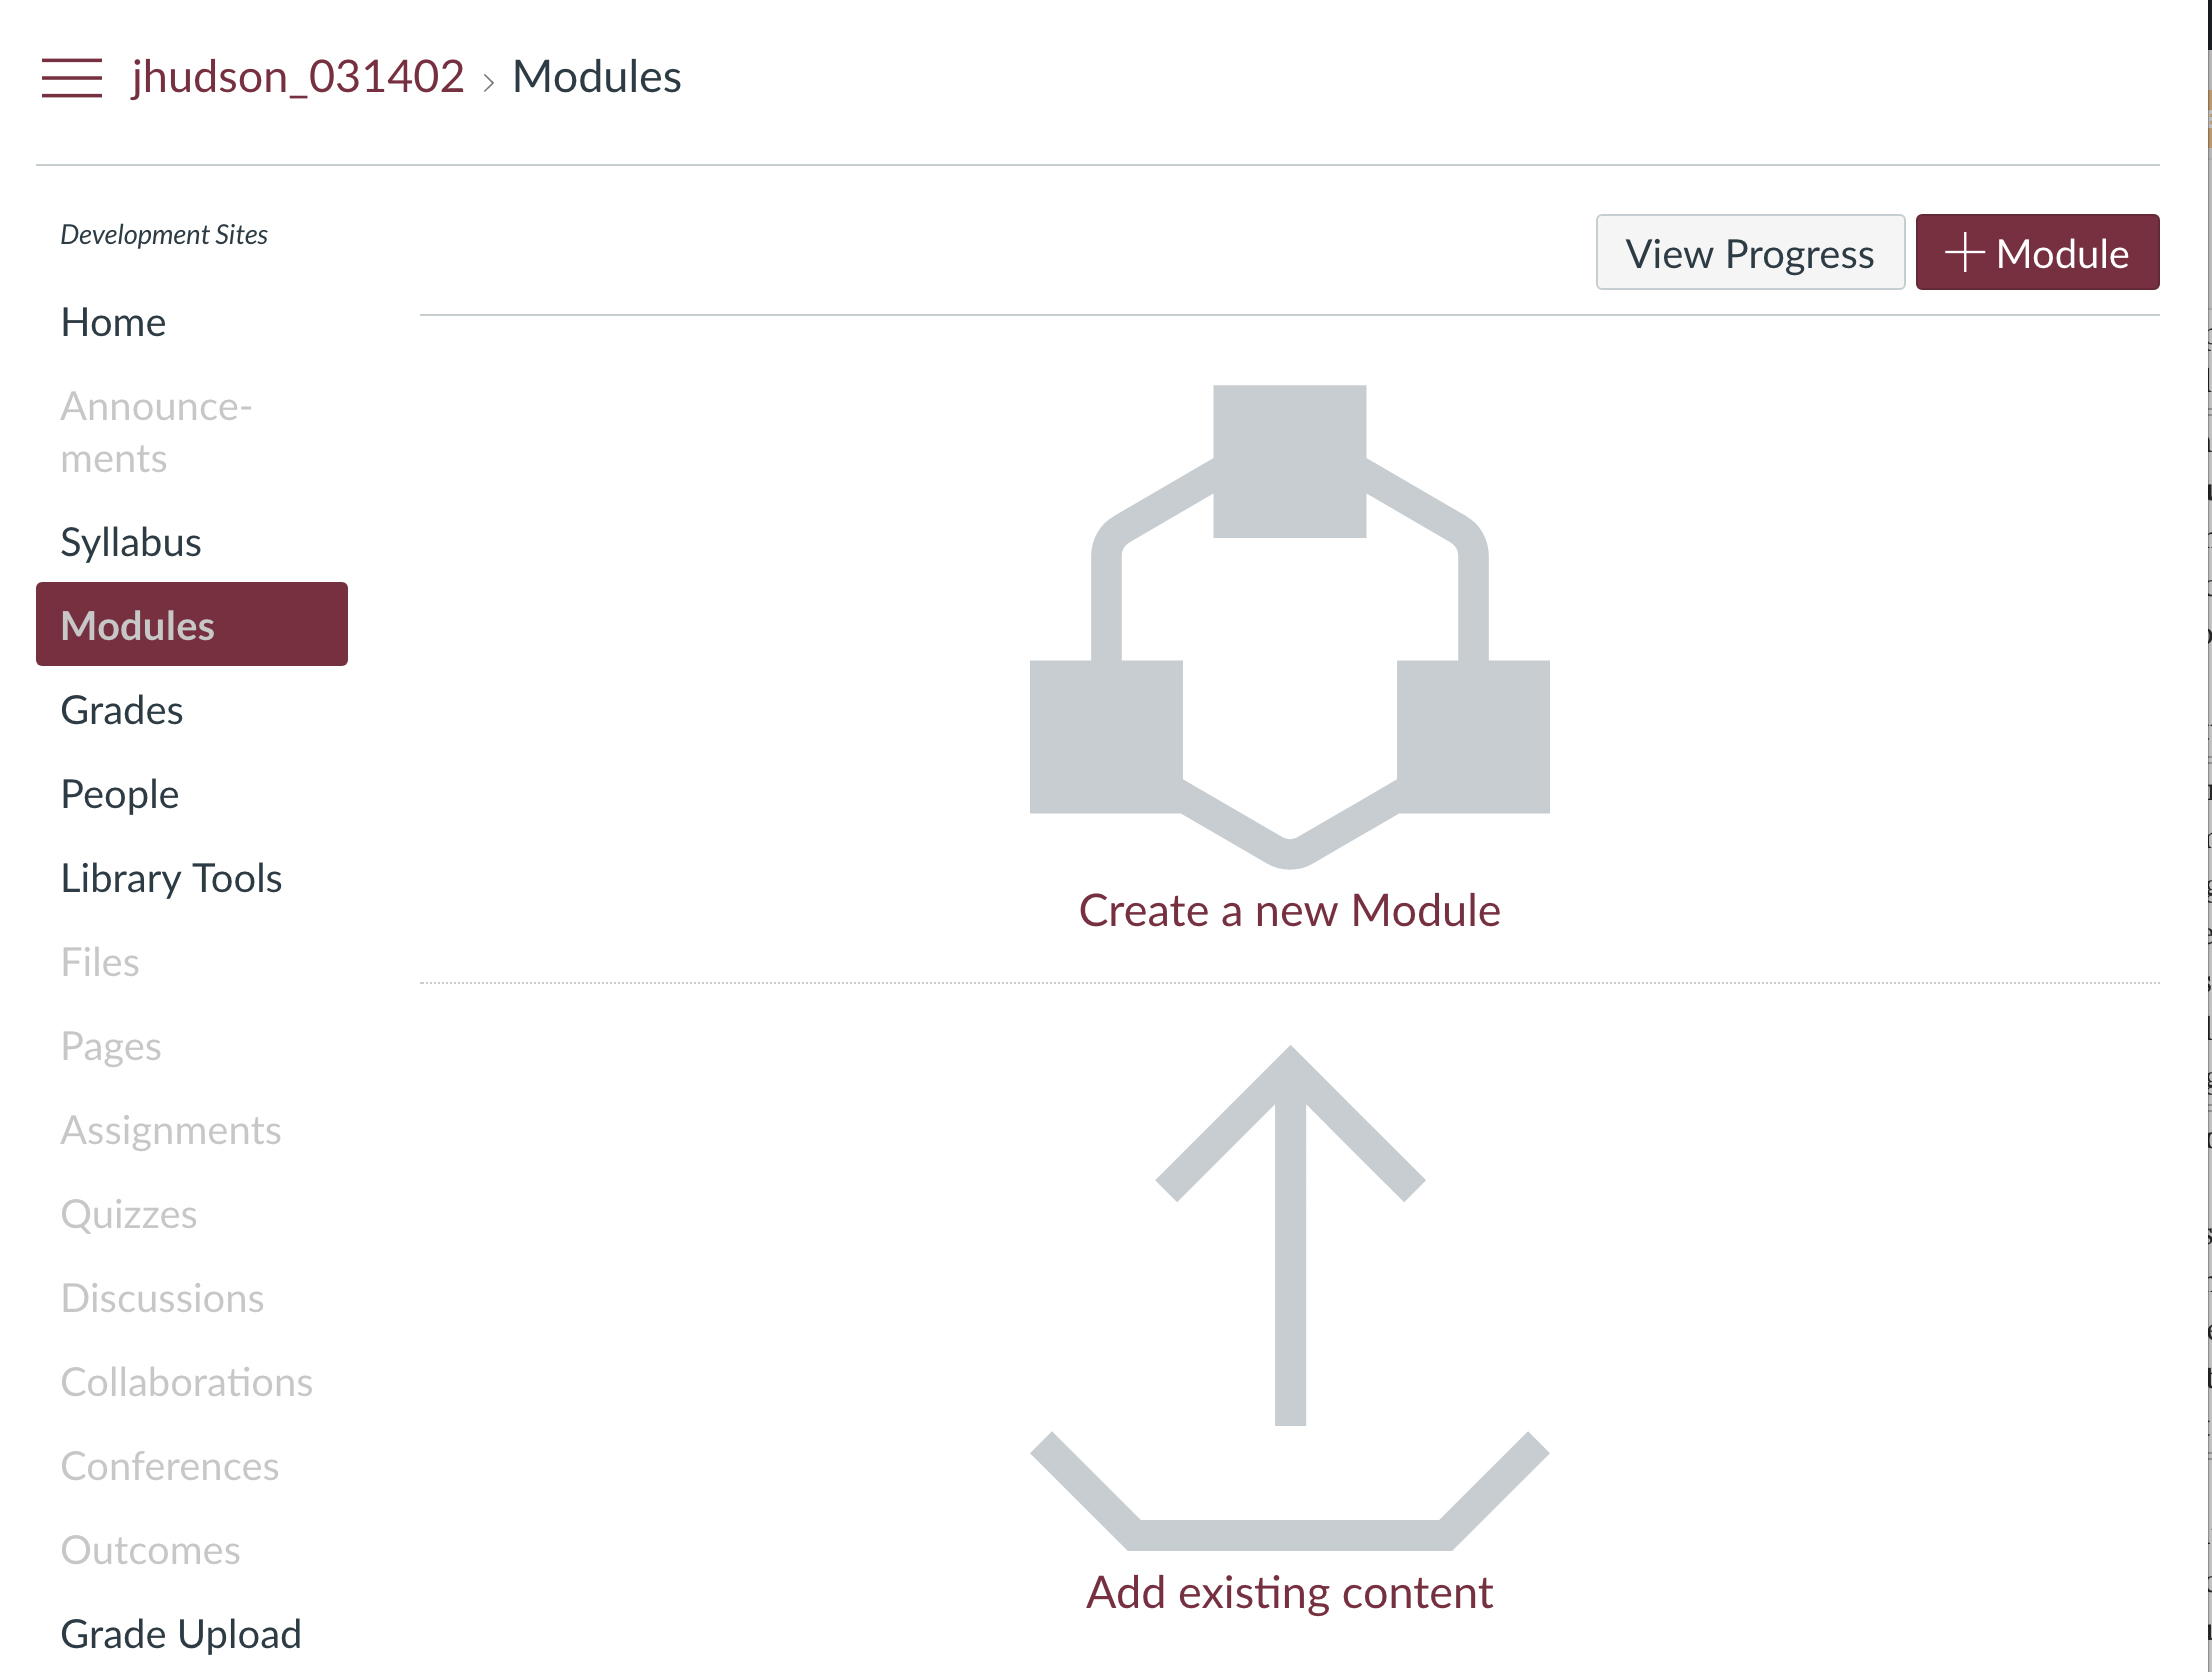
Modules are more elaborate sets of pages. If you teach online, or if you plan to include a variety of interactive features in your Canvas site (quizzes, discussions, online assignments), modules may work best for you. You can set up timers, schedules, and prerequisites; for example, requiring the completion of one module before beginning another.
Click Modules in the left navigation column to get started. As you create new modules, you can set requirements and/or schedules for access and completion. |
 |
UPLOAD & LINK FILES (2 STEPS) |
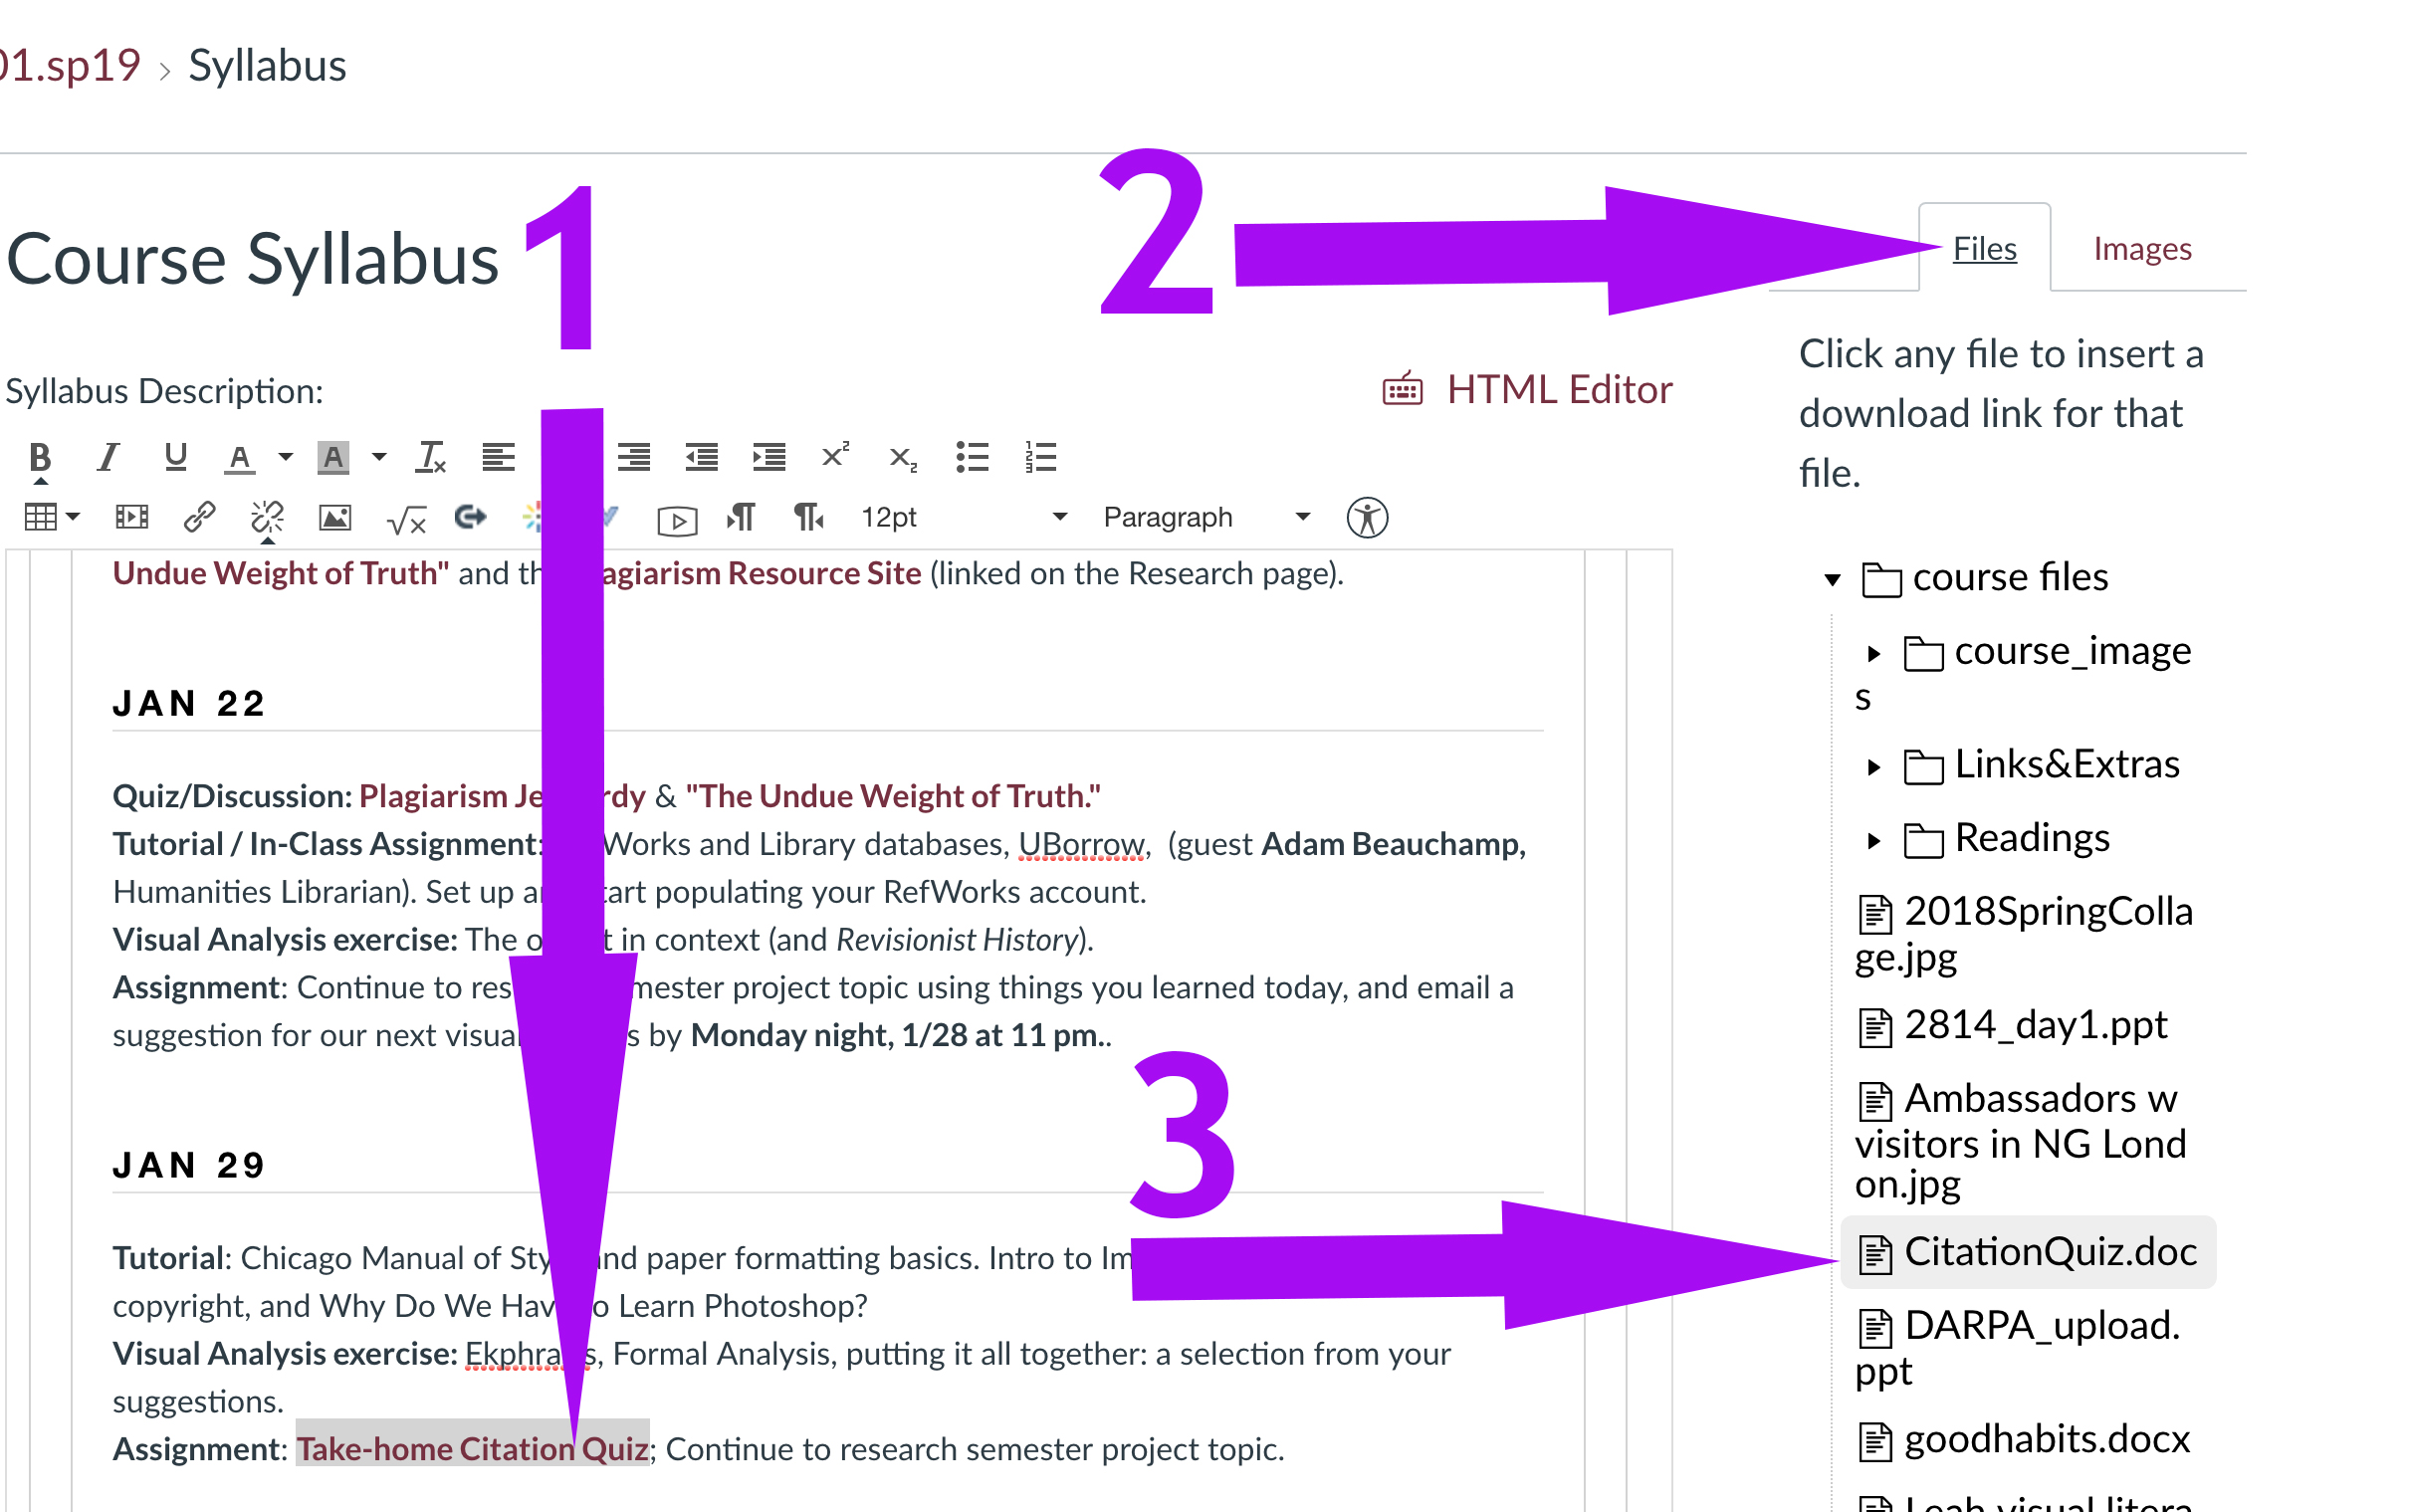
There are a couple ways to add documents from your computer to your Canvas site. To add multiple files at once and then create individual links to them on your pages, click Files in the left navigation column and upload your files there. Sort them into folders by course name (and subfolders by topic area or by week, if you like).
Then go to a page where you want to link a file, or a section in your Syllabus. Highlight the text where you want to create the link, then click the Files tab on the right. Find the file you want the text to link to, and click it. The area around the text will glow yellow for a second, and the text becomes an active link. Be sure to Save the page whenever you make changes. |
 |
UPLOAD & LINK FILES (SIMULTANEOUS) |
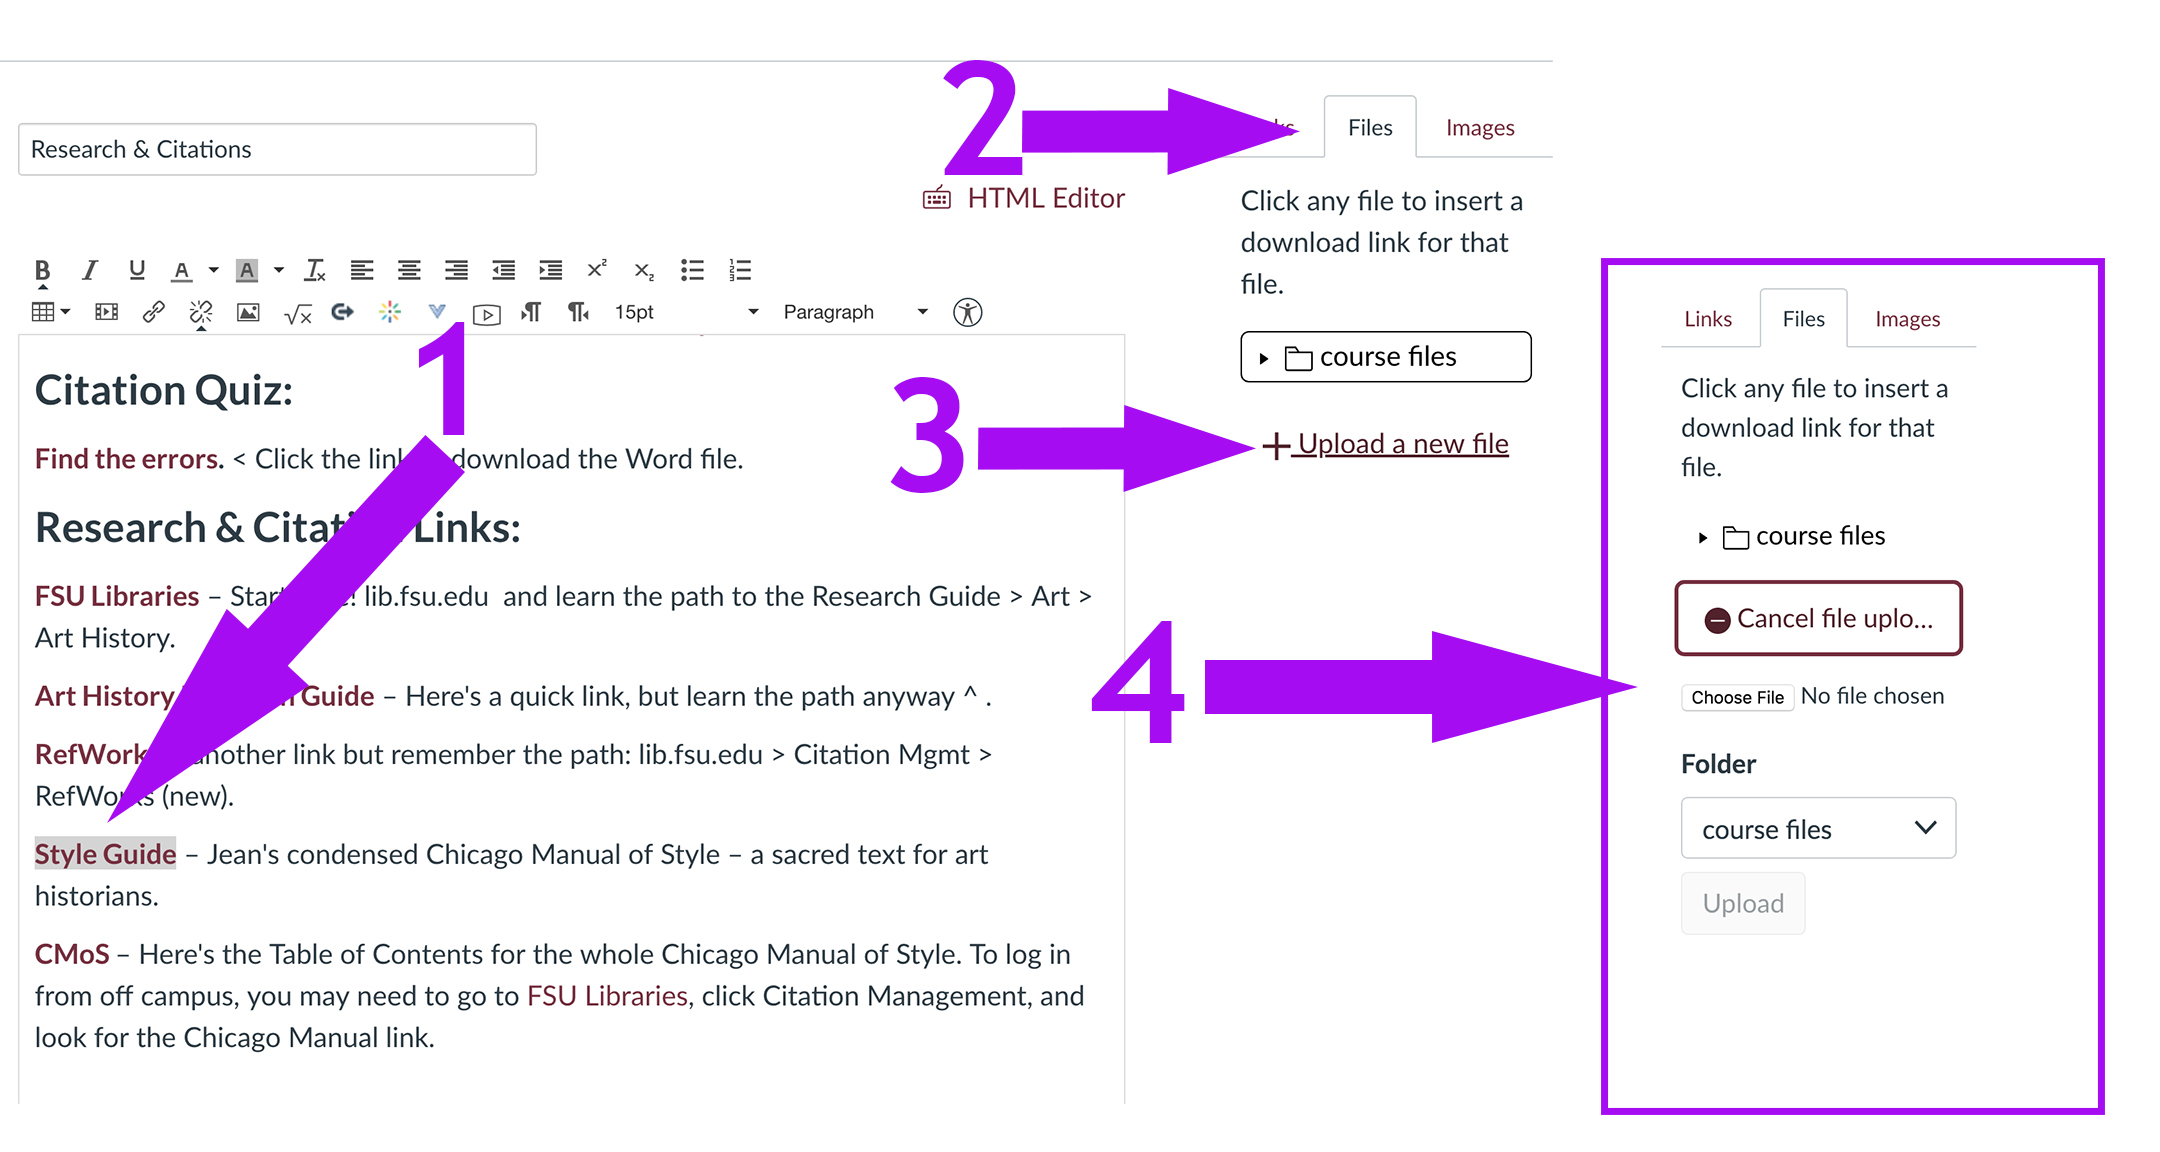
To add one file and immediately link to it on a page, first go to the page where you want to link it. Highlight the text that will be the link.
Then click the Files tab on the right, and at the bottom of the column click Upload a New File. On the next window, click Choose File, select the folder to store it in, and click Upload. As above, the area around the text will glow yellow for a second, and the text becomes an active link, which should automatically open in a new tab when clicked. |
 |
EXTERNAL LINKS |
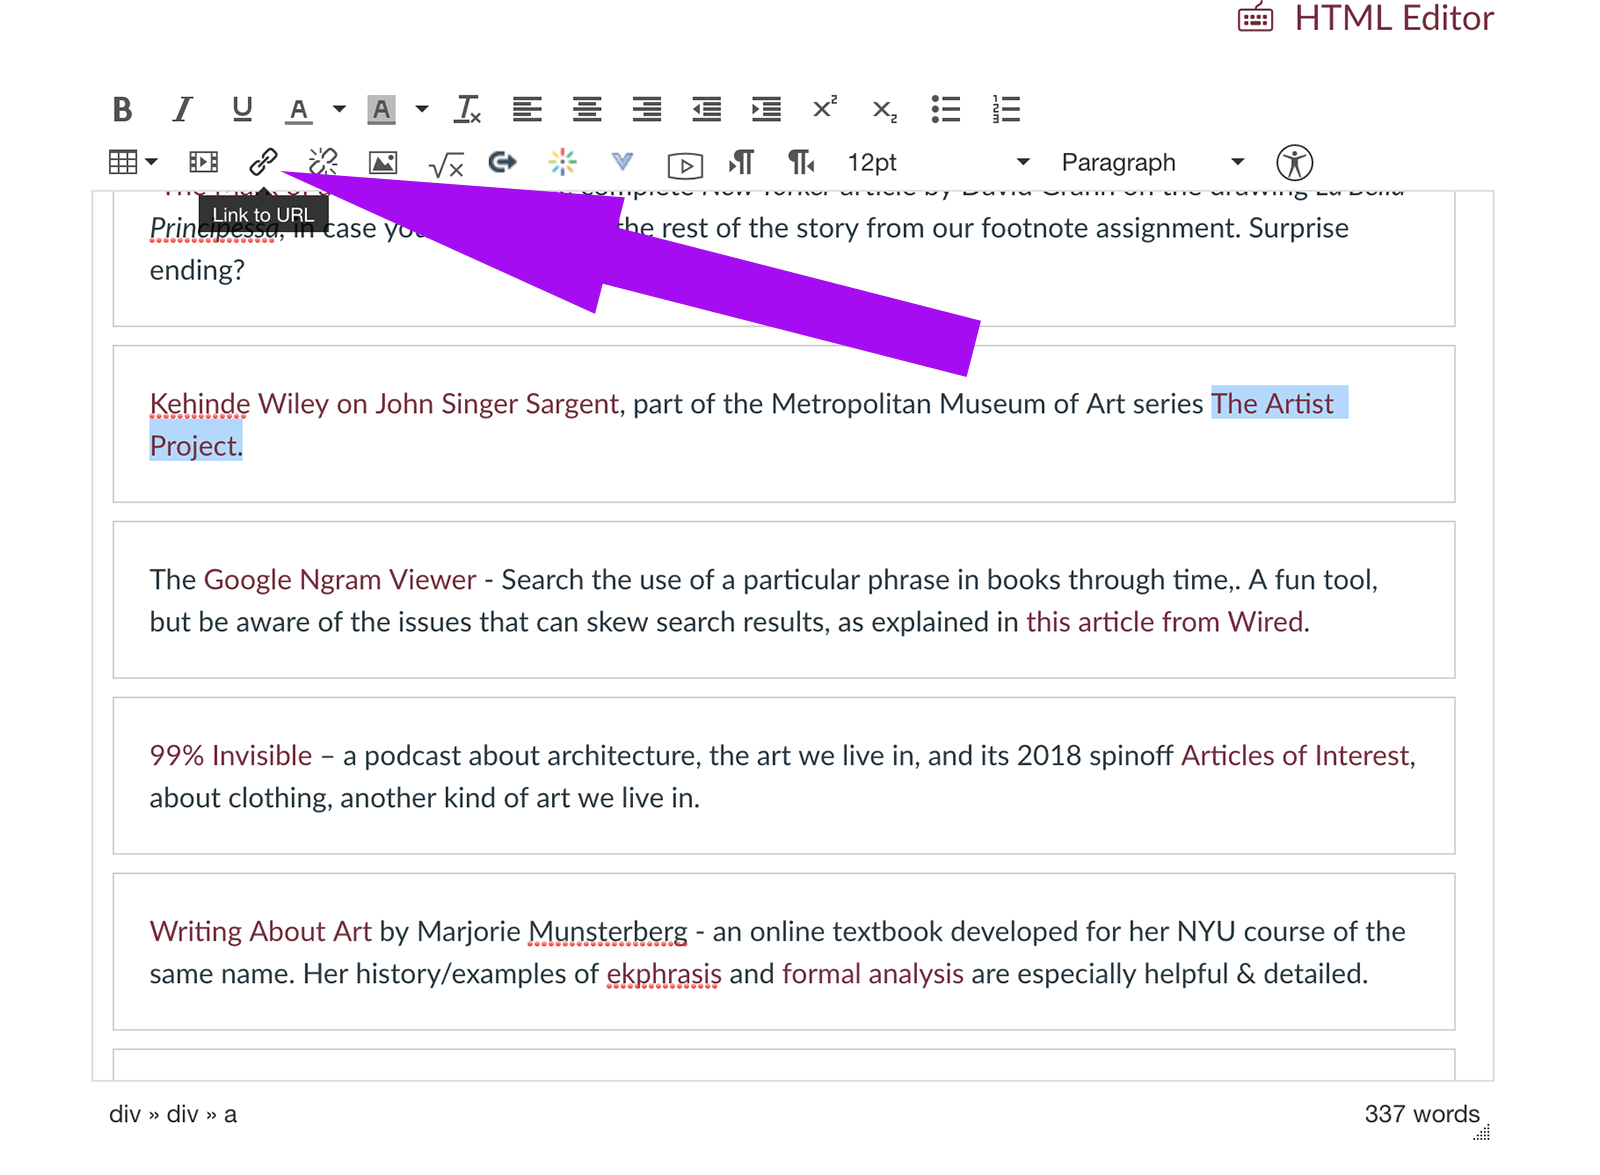
To put a link to an external website on a page, click Edit, highlight the text you want to make into a link, and either use the keyboard shortcut Command-k or click the link icon in the editing bar at the top of the page (it looks like a chain link). Type or paste the URL.
To edit a link, click anywhere on the text (no need to completely highlight it) and use the shortcut Command-k to open the URL editing window. |
 |
ADDING TAs / COLLEAGUES |
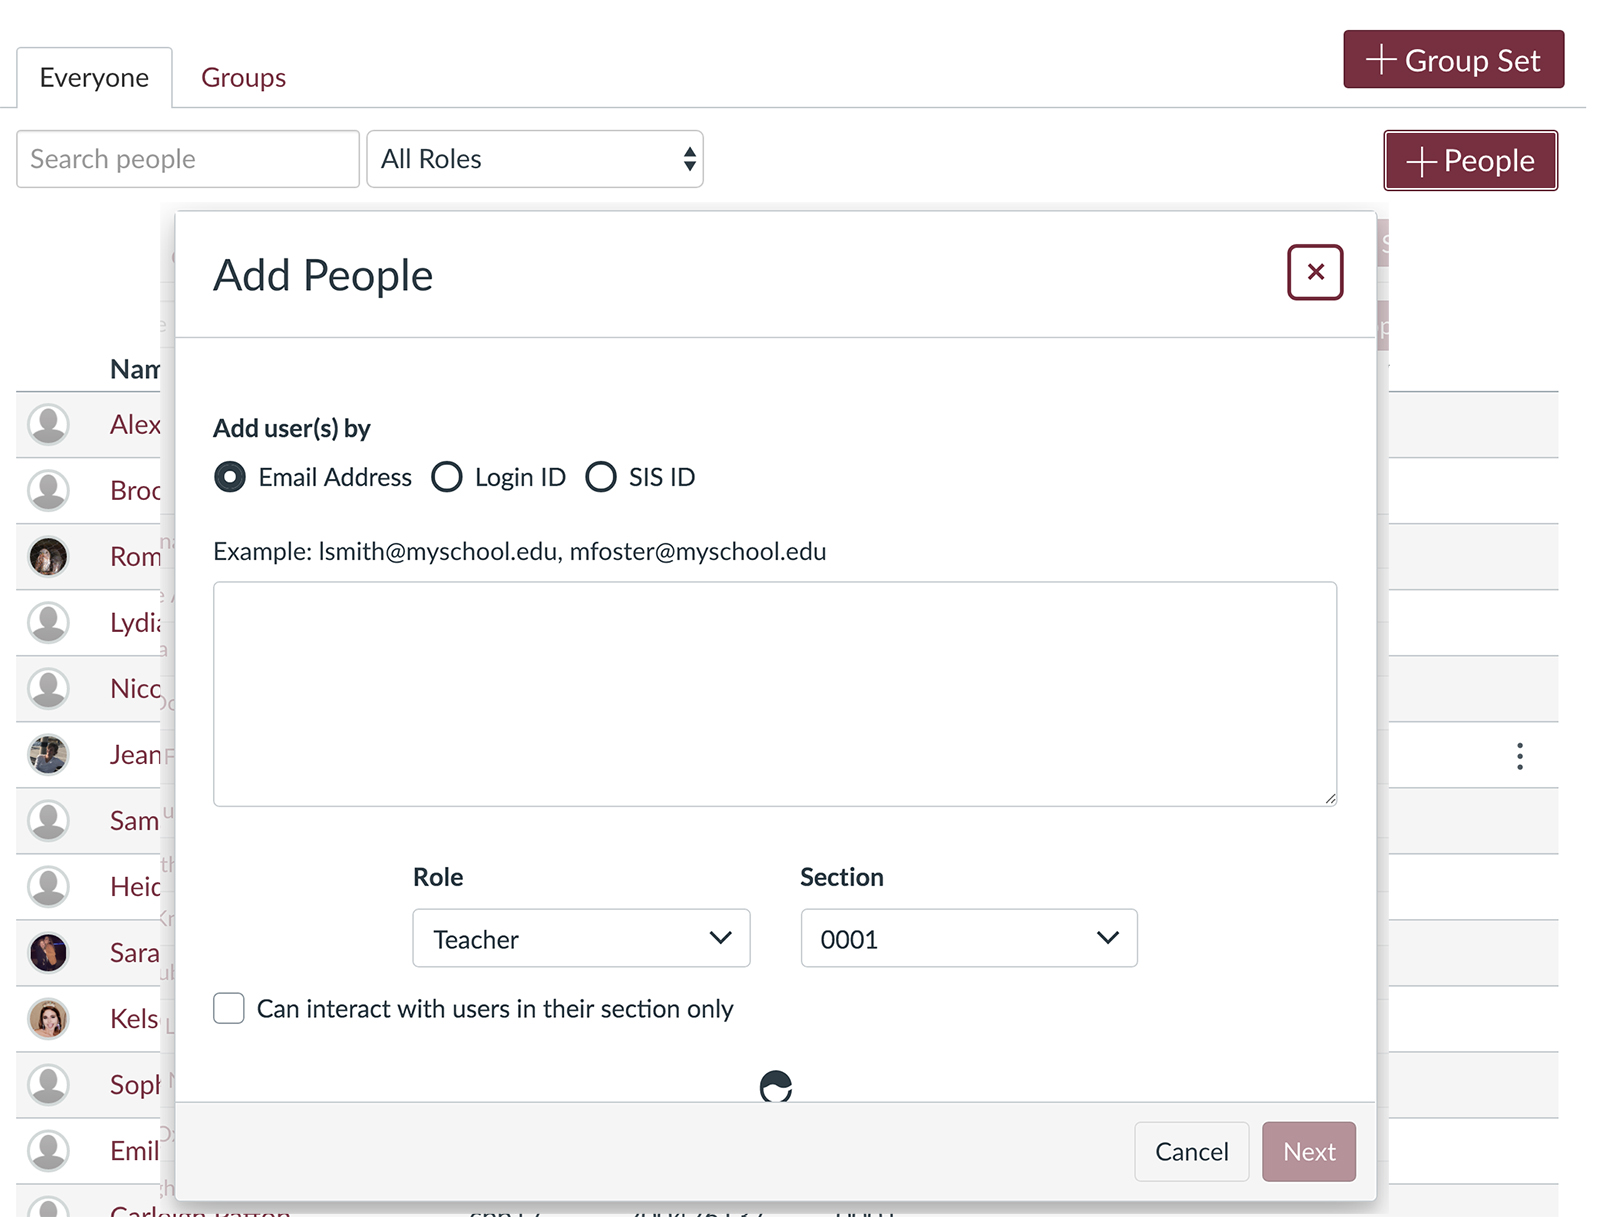
Students enrolled in a course will automatically be added to the Canvas course site. To add colleagues or student assistants, click People in the left navigation column, then +People on the right.
On the next window, click Login ID and enter the person’s FSUID (the first part of their email address). Assign the Role for the person you are adding, then click Next on the bottom right. (Designer: access to edit the course site; TA: access to edit and also to the gradebook; Teacher: all access plus the ability to add other users and manage course settings.) |
 |
ADDING STUDENTS
|
Adding students to your Canvas site – even if they are only auditing the class or sitting in – requires the assistance of the Office of Distance Learning. Fill out the Manual Student Enrollment Form or email ODL Support: canvas@fsu.edu. The turnaround time on these requests is usually very fast.
To change the role of a student already enrolled in your Canvas site, you will also need to email ODL. NOTE: The Observer role is not for observing the course, but for individuals who observe and work with specific students, such as tutors or assistants for students with special needs. |
 |
GRADEBOOK |
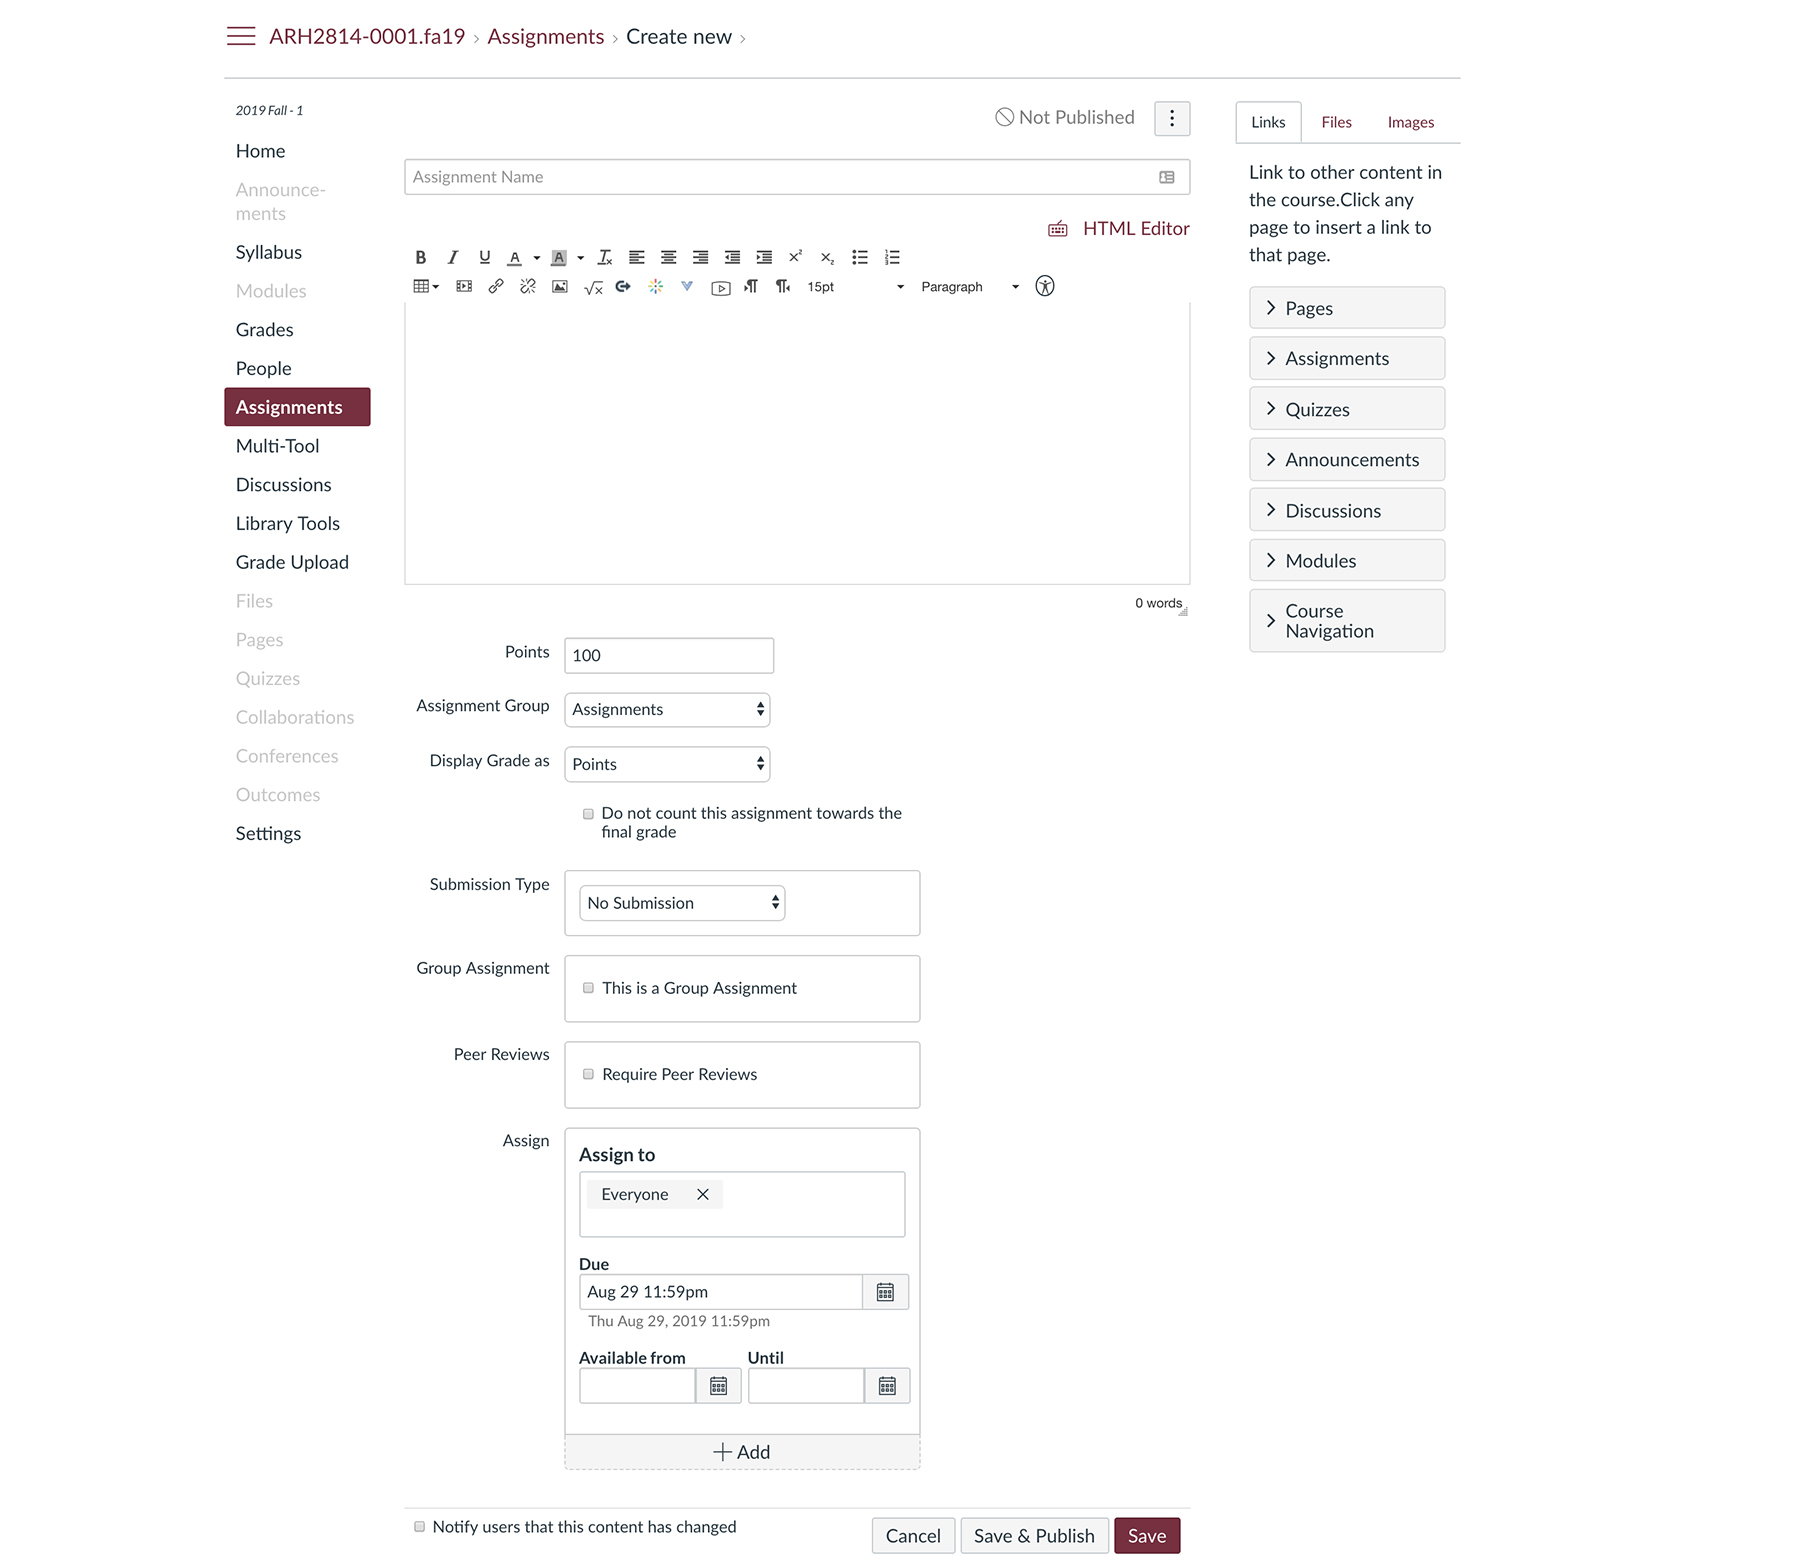
Gradebook columns are automatically generated when you create Assignments. This area includes all graded material for your course: exams, quizzes, essays, participation grades, etc.
Click Assignments in the left column, then +Assignment on the right, and fill in the information for the item. The Submission option refers to materials that will be entered/graded online, so in most cases you can choose No Submission. Entering a Due dates at the bottom of the Assignment window ensures that the item will be listed under the Course Summary (automatically generated on the bottom of the Syllabus page) and reminders will appear on your students’ Dashboards and messages. |
 |
DEVELOPMENT SITES |
If you want to start building future courses, you can request as many development sites as you want. Click Help, then choose Request a Dev Site. A form will open where you can select the number of sites you want (unlimited).
Once you have a course built in a dev site, you can copy the entire content over to a new course site whenever it appears, using the Copy Content info above, or the Export info below. |
 |
EXPORT COURSE |
You can export and save past courses or development sites on your computer, and use them in the future when you create new course sites:
In the course or development site you want to save, click Settings on lower left, then select Export Course Content on the far right. This process will create an export package file of the whole course, which you save to your computer. Later, in a new course, click Settings, Import Course Content (also on the far right), and browse to the package file on your computer. As in the Copy Content info above, you can import the whole course, or just certain elements. |
 |
RESTORE DELETED ITEMS |
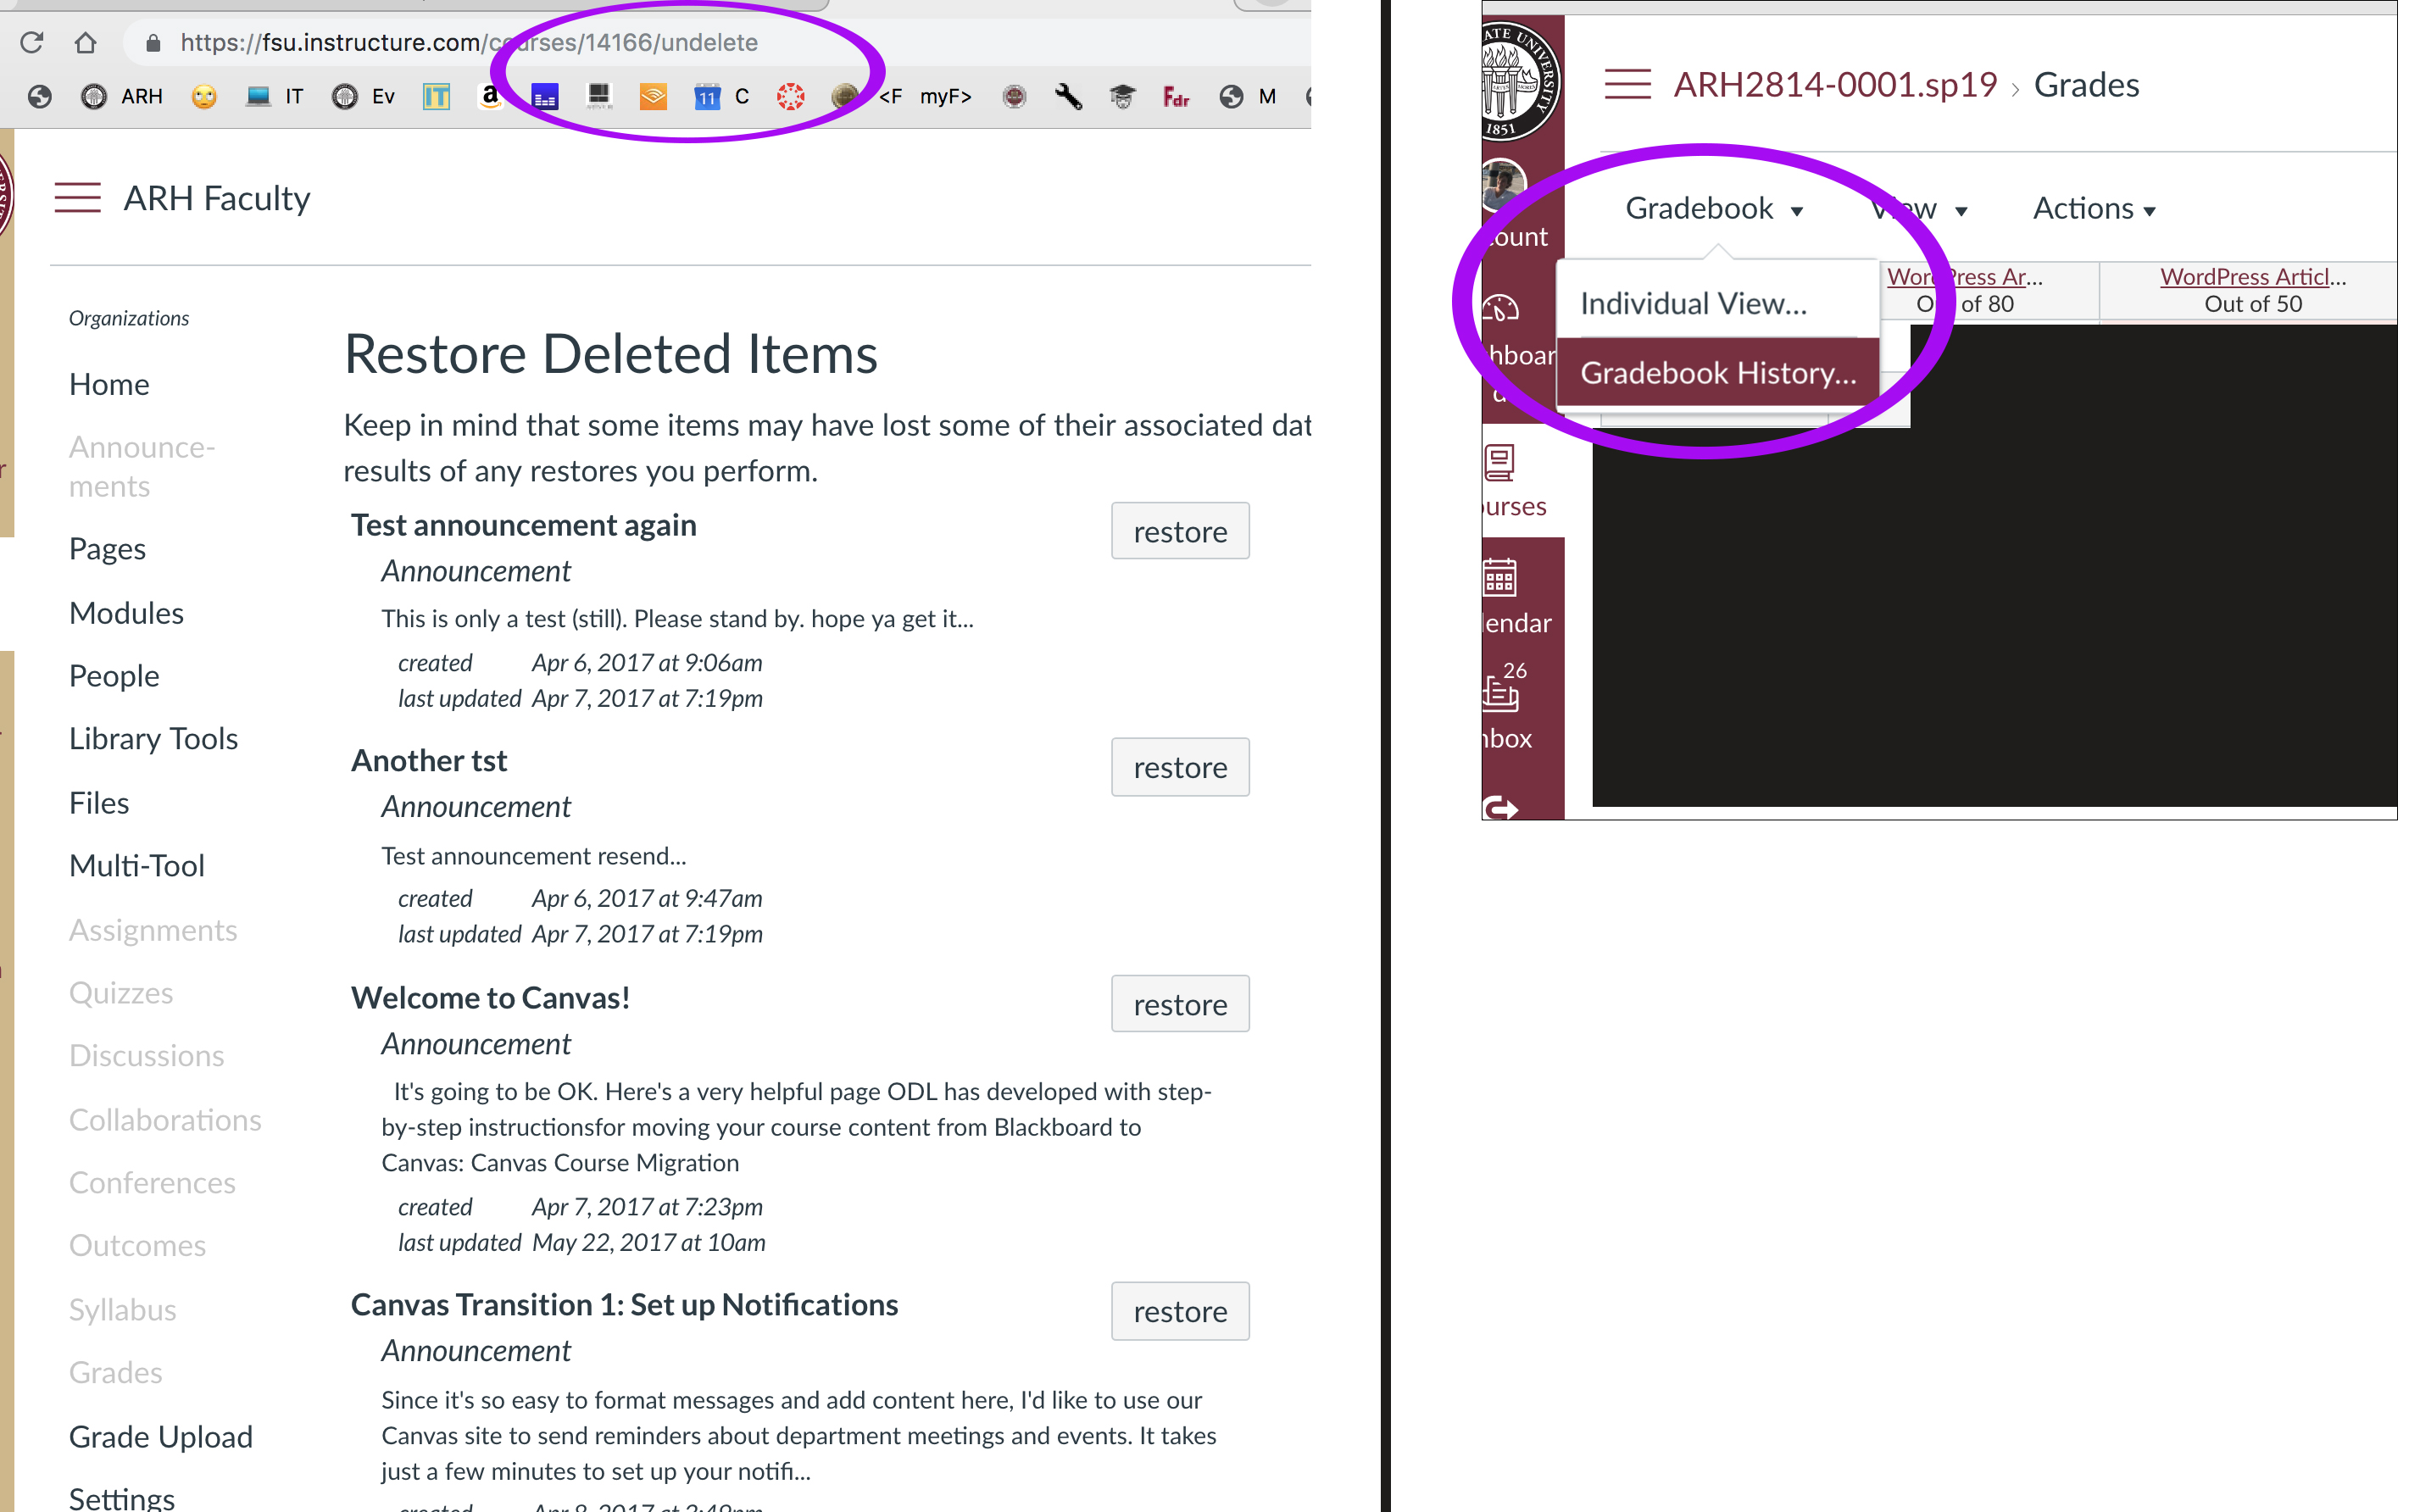
It is very easy to accidentally delete an item in Canvas – including an Assignment and all the grades you’ve posted for it. Fortunately, it is also easy to recover deleted items. Just go to your course main page, and in the address bar at the end of the URL (e.g. https://fsu.instructure.com/courses/54321), type: /undelete.
This will bring up a list of pages, files, assignments etc. you have deleted, and you can Restore any of them. It is also possible to review previously posted grades, even for assignments you have deleted (accidentally or not). In the Gradebook, click on the drop-down Gradebook menu on the top left, and select View Grading History . |
 |
ARH-ONLY FEATURE:
|
In Art History courses, students are able to send email to all other students in a course. This is a special setting for ARH classes that bypasses FSU’s standard limitation on student messages – which was put in place to prevent students from using the Canvas message system as a forum for selling exam notes or advertising subleases. If you find that students are abusing the system, please explain to them why the behavior is unacceptable and ask them to stop. | |
COURSE SIZE |
Canvas course sites are set to allow 1G of data; however, there are no overall space limitations for users. If you need more than 1G for a course site, just contact ODL to request additional space: canvas@fsu.edu.
It’s still a good idea to limit space consumption and speed up download times. When possible, instead of uploading big resources to a course, just link to them. Videos, slideshows, and other large files that are stored online and linked on your Canvas page won’t take up any space. Even embedded resources like Kaltura videos are not stored within Canvas so they don’t take up course space. When you do have a large file that you just have to upload to Canvas, compress it first. If you have a very large PDF, open it in Acrobat Pro and go to File > Save as Other > Reduced size PDF. When you create slideshows, if you use very large images and just resize them within Powerpoint, the slideshow can get really huge because the image file size does not actually change. Here’s how to compress large slideshows in Powerpoint 2016 for Mac. |